What a absolutely fun morning, lots of experimenting and feeling like a kid in a candy store :). There are a couple of challenges on the go at the moment which I have toyed with the idea of making a card for. The first is City Crafter who have a challenge which requires a bike on it and of course a digi and the other is Paper Makeup Stamps which wants you to make your own background paper. I couldn't resist - I often make my own backgrounds for my cards but I recently saw a tutorial using shaving foam - sounds so off the planet and right up my street lol. So, today was my day to play. I have put together a sort of tutorial showing how I made each of my papers for this project - hope you enjoy :)
Paper 1 - Shaving Foam Background Paper
First I had to hunt out some saving foam, alas hubby using shaving gel (maybe I will try that next time :) but I remembered on of the airlines gave us wash bags during a long flight and hubby's had shaving foam in it - now just to remember where it ended up. As you can see I found it. To make the background paper, squirt shaving foam onto a plate and add drops of food colouring. I opted to make a really strong instant coffee concoction instead as I didn't have any suitable food colours which would match my card.

Next, use cocktail sticks or skewer to mix the shaving foam and dye together in swirly patterns.

Step 3 is to place you paper on top of the mixture, I did mine a few times and squiggled it here and there too - now that was fun lol

Remove the paper carefully, try to lift it up rather than drag it to much. It looks like I have two meringues ready to cook but somehow I don't think they would taste very nice (mind you, my cooking abilities are rubbish so even the real thing probably couldn't be eaten either)

Use a scraper or something similar and scrape the shaving foam off the paper, what you are left with is the dye on the paper giving a lovely marbled effect. You can see the finish paper in the last photo of this tutorial. Sorry I kept forgetting to take all the pics as I was going along :(

Paper 2 - Material and Embossing Powders
I used double sided adhesive spray on some gold coloured net material I had and applied this to the material creating folds of different sizes.

It looked a bit bland and was obviously sticky so I sprinkled clear embossing powder all over and added a bit of copper too.

Next step was to use the heat gun to make it all set. Now the fun started here - I had a though, saying as the material was nylon, if I moved the heat gun closer would it melt - just had to try and yes it did. I was delighted with the outcome of this paper, so tactile but also strong and very different.

Paper 3 - Embossing, distress ink and a bit extra
The paper was embossed using a Spellbinders embossing folder then I distressed it. Not sure why, it didn't seem to make much difference for what I was doing lol.

Next I dabbed Tim Holtz Distress Ink over the raised dots.

Something not right, this is not the colour I wanted, so now for the bit extra. Out with my trusty Promarkers and the spray gun attachment - thats better :)

Paper 4 - Toilet Paper
For this paper I used a couple of sheets of toilet paper and dabbed with the distress ink and then sprayed with the same Promarker colours as I used in Paper 3. Once again I forgot to take a pic but you can see the outome in the last photo.

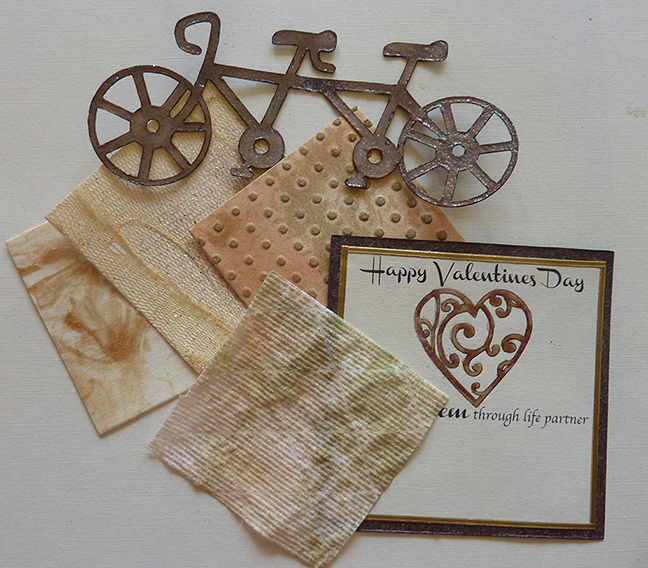
With all the papers made, it was onto the topper. I created the sentiment ad printed with the digi 'Heart Charm' by Digi Darla Digital Stamps. Using the same Promarker Colours I coloured the digi and then added embossing powder to give that lovely dimensional glossy finish.

Now for the die cut. I used a die cut from Scrapbooking Table of a single bike and modified it to create the tandem. This was then cut out of white card using SCAL and my Black Cat. Next I colour it in with Umber Promarker and again embossed with clear embossing powder. I just love how this turned out, a sort of vintage bike look.

With all the basic elements for the card created it next time to finish bits of and mini assemble. The background papers were cut using Sizzix - squares along with the brown backing paper for the sentiment/digi topper. I added gold peel off line stickers to the sentiment/digi topper too.
Finally time to make the card. It is so much fun making the different elements for cards and then the magic of putting everything together and seeing what the imagination envisioned come to reality. The only paper that caused me grief was the toilet paper, the glue I used does go transparent as they advertise but I guess the toilet paper is a little to absorbent and thin so it did not really work. However, not to be disheartened I turned a boo boo into a hurray :) I dotted more glue in random dabs to create another dotty pattern. Sometimes things are just meant to happen and now I have two dotty papers and two line fold looking papers - yep works just fine :)
And now for the finished card . . . . .

Ingredients:-
- Cream card from Craft Creations
- Brown backing paper from Paper Box
- 4 home made background papers using shaving foam, coffee, material, embossing folder, toilet paper, Promarkers with spray gun and Zig Zag glue
- Sentiment by me
- Digi - Heart Charm by Digi Darla
- Tandem die form Scrapbooking Table and modified by me
- Promarkes
- Clear and copper embossing powders, hessian, gems etc from my stash
- City Crafter - #176 ~ Daisy Daisy..... (of a bicycle build for two) (Sept 17)
- Paper Makeup Stamps - #105 - Make Your Own Background (Sept 16)
- The Male Room - #4 Sports and Hobbies (hobby is cycling) (Sept 25)
- Ruby's Rainbow - Ch#62 It's a Male Thing (Sept 18)
- Stampotique - #116: Try a new technique (Oct 1)
- Whimsy Stamps - Masculine Cards (Oct 2)
What a lovely card and such great effects with your papers ... Thanks so much for playing along at CCCB!!
ReplyDeletestunning bg-ideas! this was so inspiring!
ReplyDeleteand your card is very cool!
thank you so much for playing along with us at ruby's rainbow challenges!
hugs and kisses from germany,
silvi xoxo
Gorgeous ... the finished card is well worth all the efforts you put into designing every element. I had such fun reading (and re-reading) all your 'tutorial' and imagining you turning your craft room into a messy play room. What fun you must have had. The shaving foam technique reminded me of marbling paper but without having leave it so long to dry. Now, be honest, how many times did you have to detach yourslf from the sticky net? I can't actually choose a single favourite paper because they are all wonderful and work brilliantly together. Your tandem bike looks lovely and aged but you have got to answer to the fact that I just cannot get the song 'Daisy, Daisy' out of my head and it's driving me mad. Love you xxx
ReplyDeleteGreat card, it is well worth all the efforts you put into it.
ReplyDeleteHermien
dt-papermakeupstamps
Fantastic card!! Love all the texture!!Thanks so much for playing along at CCCB!!
ReplyDeleteThis should be a $25 card, Mimi, with all the time and work and talent that has gone into it!! Just a brilliant outcome, though, and well worth your efforts. It is truly a work of art! Good luck with your Stampotique DT application!!
ReplyDeleteThose hand crafted background papers are FAB!, thanks for showing us how too. Welcome to The Male Room, see you again soon.
ReplyDeleteFab card - thanks for sharing this week in The Male Room - Jacqueline xx
ReplyDeleteAwesome! Thanks for sharing it with us at CCCB!
ReplyDeleteWow! Love all your crafting tips! The papers you have made look so good and you're right, a cycling theme is perfect for our challenge this week at The Male Room. Thanks for sharing
ReplyDeleteLouise xx
Wow what a fun technique! It's so creative. I love the result.
ReplyDelete