Followers

Friday, September 13, 2013

Kizzy

I thought I would make an animal card today, a bit challenging as I don't think real animals are easy to colour in the least :)

For this card I used the 'Yorkshire Terrier' Digital Stamp and Paper Pack' available through the StitchyBear Digital Outlet.  I used the two fur digital papers from the pack for my double layer background and also for the card insert.  The digital stamp was coloured with ProMarkers and some new Flex Markers which hubby bought for me yesterday and I had to try :).  Several dies were used, for the second layer background I used Spellbinders Grand-Nestabilities Grand Labels 1, the copper floral die is CArt Decorative Oval Frames, the border is Sizzix Thinlits Die Set 4pk - Borders by Rachael Bright and for the digi centre oval and border I used Marianne Design Flower Border Oval.  I made the bone topper by printing on card and fussy cutting then colouring with Promarker.  After colouring and cutting the digi section I printed a second image of the dog and cut this out to protect the image by masking while I used my Promarker again with the spray gun attachment.  Gold lace and pearls were added (just for a touch of class <g>).  Stickles were then used just to carry a dark colour between the dark of the background paper and the dark of the Yorkshire Terrier.  The bone and the digi with frame were attached with foam tape for added dimension.


Inside of card

Ingredients:-
  • White Linen card from Craft Creations
  • Digi - 'Yorkshire Terrier' Digital Stamp and Paper Pack' available from the StitchyBear Digital Outlet 
  • Dies - Spellbinders Grand-Nestabilities Grand Labels 1, CArt Decorative Oval Frames, Sizzix Thinlits Die Set 4pk - Borders,  Marianne Design Flower Border Oval.
  • ProMarkers/FlexMarkers - (PM) Cool Grey 1-5, Pastel Yellow, Saffron, Spice and Black,  (FM) Rosewood, Champagne, Nutmeg and Auburn.  Blender also used.
  • Cinnamon Stickles
  • Lace and pearls from my stash
I am entering this card into the following challenges:-

Thursday, September 12, 2013

Tandem Valentine


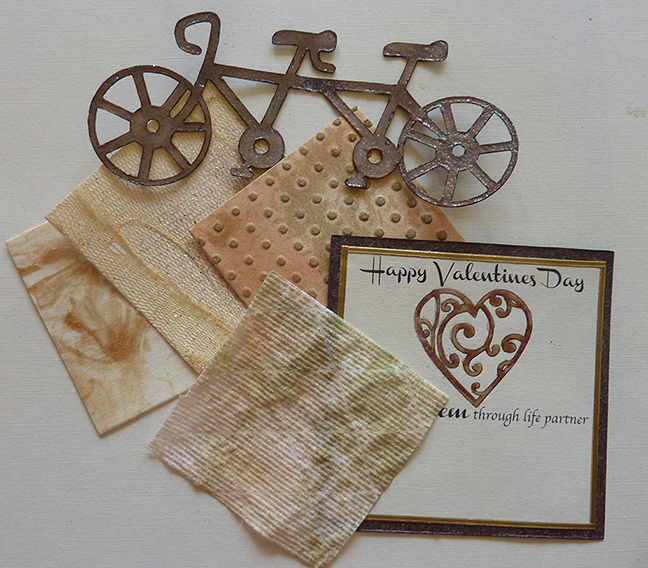
What a absolutely fun morning, lots of experimenting and feeling like a kid in a candy store :).  There are a couple of challenges on the go at the moment which I have toyed with the idea of making a card for.  The first is City Crafter who have a challenge which requires a bike on it and of course a digi and the other is Paper Makeup Stamps which wants you to make your own background paper.  I couldn't resist - I often make my own backgrounds for my cards but I recently saw a tutorial using shaving foam - sounds so off the planet and right up my street lol.  So, today was my day to play.  I have put together a sort of tutorial showing how I made each of my papers for this project - hope you enjoy :)

Paper 1 - Shaving Foam Background Paper
First I had to hunt out some saving foam, alas hubby using shaving gel (maybe I will try that next time :) but I remembered on of the airlines gave us wash bags during a long flight and hubby's had shaving foam in it - now just to remember where it ended up.  As you can see I found it.  To make the background paper, squirt shaving foam onto a plate and add drops of food colouring.  I opted to make a really strong instant coffee concoction instead as I didn't have any suitable food colours which would match my card.

Next, use cocktail sticks or skewer to mix the shaving foam and dye together in swirly patterns.

Step 3 is to place you paper on top of the mixture, I did mine a few times and squiggled it here and there too - now that was fun lol

Remove the paper carefully, try to lift it up rather than drag it to much.  It looks like I have two meringues ready to cook but somehow I don't think they would taste very nice (mind you, my cooking abilities are rubbish so even the real thing probably couldn't be eaten either)

 Use a scraper or something similar and scrape the shaving foam off the paper, what you are left with is the dye on the paper giving a lovely marbled effect.  You can see the finish paper in the last photo of this tutorial. Sorry I kept forgetting to take all the pics as I was going along :(

Paper 2 - Material and Embossing Powders
I used double sided adhesive spray on some gold coloured net material I had and applied this to the material creating folds of different sizes.

It looked a bit bland and was obviously sticky so I sprinkled clear embossing powder all over and added a bit of copper too.

Next step was to use the heat gun to make it all set.  Now the fun started here - I had a though, saying as the material was nylon, if I moved the heat gun closer would it melt - just had to try and yes it did.  I was delighted with the outcome of this paper, so tactile but also strong and very different.

Paper 3 - Embossing, distress ink and a bit extra
The paper was embossed using a Spellbinders embossing folder then I distressed it.  Not sure why, it didn't seem to make much difference for what I was doing lol.

Next I dabbed Tim Holtz Distress Ink over the raised dots. 

Something not right, this is not the colour I wanted, so now for the bit extra.  Out with my trusty Promarkers and the spray gun attachment - thats better :)

Paper 4 - Toilet Paper 
For this paper I used a couple of sheets of toilet paper and dabbed with the distress ink and then sprayed with the same Promarker colours as I used in Paper 3.  Once again I forgot to take a pic but you can see the outome in the last photo.

With all the papers made, it was onto the topper.  I created the sentiment ad printed with the digi 'Heart Charm' by Digi Darla Digital Stamps.  Using the same Promarker Colours I coloured the digi and then added embossing powder to give that lovely dimensional glossy finish.

Now for the die cut.  I used a die cut from Scrapbooking Table of a single bike and modified it to create the tandem.  This was then cut out of white card using SCAL and my Black Cat.  Next I colour it in with Umber Promarker and again embossed with clear embossing powder. I just love how this turned out, a sort of vintage bike look.

With all the basic elements for the card created it next time to finish bits of and mini assemble.  The background papers were cut using Sizzix - squares along with the brown backing paper for the sentiment/digi topper. I added gold peel off line stickers to the sentiment/digi topper too.

Finally time to make the card.  It is so much fun making the different elements for cards and then the magic of putting everything together and seeing what the imagination envisioned come to reality.  The only paper that caused me grief was the toilet paper, the glue I used does go transparent as they advertise but I guess the toilet paper is a little to absorbent and thin so it did not really work.  However, not to be disheartened I turned a boo boo into a hurray :)  I dotted more glue in random dabs to create another dotty pattern.  Sometimes things are just meant to happen and now I have two dotty papers and two line fold looking papers - yep works just fine :)

And now for the finished card . . . . .

Ingredients:-
  • Cream card from Craft Creations
  • Brown backing paper from Paper Box
  • 4 home made background papers using shaving foam, coffee, material, embossing folder, toilet paper, Promarkers with spray gun and Zig Zag glue
  • Sentiment by me
  • Digi - Heart Charm by Digi Darla
  • Tandem die form Scrapbooking Table and modified by me
  • Promarkes
  • Clear and copper embossing powders, hessian, gems etc from my stash
I am entering this card into the following challenges:-

Wednesday, September 11, 2013

Dreams

Another day and time for another card :)

For this card I used a photo I took out of the airplane window on my last trip back to the UK for the DP paper which I then embossed with and Embossilicious Embossing Folder.  The text on the front of the card was added to the DP paper before printing.  I used the same image and embossing folder for the inside of the card too.

I went to town with my Cherry Lynn Designs dies using three different ones.  I just love the dream-catcher and this is the first time I have used it.  I decided to use silver glitter paper for the dream-catcher and other silver items on the card to represent the fact that every cloud has a silver lining (so if you have rotten dreams just remember they can only get better <g>)

Other dies I used were Cherry Lynn Tropical Flourish and Mimi Butterflies - oh and how I love my mini butterflies, one of the best dies I have, just so versatile. When cutting all the dies I used waxed paper to help release them and have kept these wax bits to add to the card. I was trying to create a delicate floaty effect lol.

Feathers were added to the feather areas on the dream-catcher and pearls too.  Liquid Pearls were used in other areas.


Ingredients:
  • White Linen and Blue Pearl card from Craft Creations
  • Dies - Cheery Lynn Designs:- Dream-catcher, Tropical Flourish and Mimi Butterflies. For the sentiment I used X-Cut Large Tags
  • Background paper by me from a photo I took
  • Embossilicious Embossing Folder
  • Pearls, Liquid Pearls, gems ribbon and lace ribbon from my stash
I would like to enter this card into the following challenges:-

Sunday, September 8, 2013

Purple Infusion

Hello folks. We have another challenge at One Stitch At A Time so how about popping over to see all the fabulous creations by the design team.

Challenge #180

Theme ' Use A Digi'  


The sponsor this week is StitchyBear Digi Outlet with a prize of the full set of digi images that the DT used in challenge #178 - WOW that's worth around $20. To win this prize you must used an item from the StitchyBear Outlet. You may still enter using any digi but the prize for winning will be $3 to spend in the outlet.

It was my teamie Ali's turn to chose a digi for Tammylee and me to work with and she chose Aubrietia Digital Stamp and Paper Pack Pack by Coosty Creations.  The pack comes with one digital stamp and four complementing digi papers.  I decided not to use the papers on the front of the card as I had another idea but did use one for the insert.  As with everything, it is not always the case of using everything at hand - sometimes I find, less is more <g>.

To begin with I created a cut out design which I cut on my Black Cat using purple card.  Originally I was using one of the digi papers behind the cut out but there was just to much going on, so as I mentioned earlier opted for not using it.  Instead I used mauve pearlized card which I had at hand.  Now with no texture and two plain colours, all be it one cut out the card looked flat.  What next - should I emboss?  And then a creative moment arose lol.  I remembered trying sometime in the past, to use bleach to rubber stamp with to remove the dye from the paper leaving the bleached outline.  I never managed to achieve this as I guess the only bleach I could find in Saudi was not the super thick strong kind.  Off I went to the kitchen to see what I had under the kitchen sink which I could put in a spray bottle.  I have Clorox so tried that - I was aiming for a speckled look on the card so spraying was the obvious choice.  Clorox did not work then I remembered there was a big bottle of some sort of bleach in the cupboard - try that.  I poured some into the spray bottle and began misting the card.  Odd smell - this was not bleach but natural vinegar (which I use with bi-carb for cleaning).  To my amazement it worked a treat although the card did not smell very nice for a while - it was almost good enough to wrap fish and chips in.  Oh how I am sure all my British pals will remember how good fish and chips were when they were wrapped in newspaper, so much better than these dreadful polystyrene boxes used now!!!!  Back to my card.  I was really pleased with the outcome so back to the craft room to carry on.  Still having the urge to continue spraying I raked out Blue Shimmer Misting Spray - now that could really work and give the contrast needed to bring this new piece of card to life.  So there you have it, new card made for my cut out design.  One thing hubby has mentioned here - acetic acid may eat the card away in time so to neutralize it spray afterwards with bi-carb or baking powder to stop the reaction. I then cut the digi three times and decoupaged it, finishing off with bisque Liquid Pearls for the flower centres.  I used Spellbinders scalloped circles, the smallest die, to cut the sentiment backing and used the bisque liquid pearls there too.  Both these sections we attached to the card with foam tape, the cut out layer was also attached with foam tape. Purple gems were added to selected areas of the cut out design and the finishing touches of a heart gem and bow were put in place.  Hope you like what I came up with, certainly had fun with this one <g>.


Inside view of card which also shows all the layering
Ingredients:-
I would like to enter this card into the following challenges:-

Saturday, September 7, 2013

Nicole

My youngest daughter's birthday is coming up and I have been thinking about her card for the past couple of weeks but nothing comes to mind, do I do something to do with rugby or the army or go kiddy and do pics (she loved one of my past projects with pigs on it) - but everything I thought of just didn't seem right.  Then I saw Delicious Doodles have a challenge this week - Purple, Turquoise and Gold (oh how I love the colours of this challenge and it was in my comfort zone).  Next choose a digi and make the card for Nicole, very out of the box as had never entered my mind to do something like this for her so I hope she likes it.  I chose the digi Dark Valentine by Delicious Doodles and am just hoping Nicole approves, I seem to recall in the past she liked 'Twighlight' and read all the books <g>

Inside of card - inlay created to match the DP on the front of the card and a sentiment added. I used the wax paper sections from the gold mirror card die cuts and sprayed with Promarkers - I think they are just perfect, a bit of texture to the inside and better than throwing them away lol.
 The tag is attached with gold thread and hidden behind the top layer (I wonder if Nicole will find it <g>). The flower stops it sliding down and becoming irretrievable and is handy for pulling it out.
 Close-up of tag
Ingredients:
  • Purple and turquoise card from Craft Creations
  • Digi - Dark Valentine from Delicious Doodles
  • DP by me and for the flowers some special paper my friend brought me back from her holidays
  • Dies - Spellbinder Fantastic Flourish One, Nestabilities Labels-20 and  Marianne Designs Creatables LR0106
  • Gold Mirror card, Extreme Glitter, Stickles, gold paint pen, brads etc from my stash
I am entering this card into the following challenges:-

Thursday, September 5, 2013

Roses

A multi layered very pink card which I tried to create with a vintage feel, not having tried vintage before I think this fits the criteria <g>.  I created the background in Photoshop and used one of the brushed by Obsidian Dawn for the scrolled image and added a sentiment from Digi Darla.  The frame was created in Illustrator, what a fun morning I had created them.  I printed the frame on card for a bit more stability and cut it out.  Two digis were used  Roses On Bush from Digi Darla and Dragonfly by Sandi Samples.  The uncoloured rose was printed on the DP and a second copy so I could decoupage it a bit.  The dragonfly was also printed twice, once on card and the other on acetate. For the rose I coloured both the main image and the decoupaged right bottom section with Promarkers, for the dragonfly I again used Promarkers (not easy on the acetate as I had had to use more of a blobbing action to stop one colour removing the other lol).  The acetate wings were then attached to the body and attached to the card with foam tape.

Lace was attached to the back of the frame and this was then mounted on the card with foam tape, pearls and pink Liquid Pearls were then used to finish off.


Inside of card
Ingredients:-
  • White Linen card from Craft Creations
  • Digis - Roses On Bush from Digi Darla, May Love Return To You This Day also from Digi Darla  and Dragonfly by Sandi Samples
  • Photoshop brush from Obsidian Dawn
  • ProMarkers used - Maroon, Cerise, Rose Pink, Blossom, Ivory, Apple, Meadow Green, Lime Green, Lime Zest and Gold Metallic
  • Lace, pearls, Stickles etc from my stash
I am entering this card in the following challenges:-

Wednesday, September 4, 2013

Blue Bird

Now this really is a labour of love.  I am in a now win situation at the moment, hands are so sore with an arthritus flare up but head is mushed if I don't have time in my craft room.  OK - no need for the sympathy vote <g> just sounding off :)

I made this card today for the City Crafter Challenge who have a challenge on the go this week 'Birds and must use Blue' - just what the doctor ordered lol, I love birds and I love blue.

For this card I first used Spellbinder die Grand Scalloped Ovals - 6   to cut out the most beautiful blue and gold paper I got years ago from Craft Creations, it was an off-cut in their bargain bin :)  Next I covered the whole card with blue lace.  Next was to cut the digi out, I printed it three times so I could decoupage areas.  The digi used is from Coosty Creations called Widow Bird and is part of the digi and digi paper paper pack available from the StitchyBear Digital Outlet.  The first bird layer was cut out using Spellbinders Nestabilities Labels 20 and the second and third layers fussy cut and decoupaged. I attached the top edge of the fussy cut sections with Zig Zag glue and the lower edges with double sided foam tape with the intention the that no seams would be visible, it looks good in real life but not very noticeable in the photo, I guess I should have taken a side view :(  Now that fussy cutting was a pain in the B**t but worth it.  I used the same die set to cut the blue mount which was embossed with a Cuttlebug Embossing Folder.  The edges of both layers were edged with gold pen.  Finally I used the dies again to make the label which is tucked behind the image with a decorative pull to get hold of and pull it out.  I added a blue gem and a coin metal charm to the tassel pull.


Card with sentiment tag pulled out

Close up of label
Ingredients:-
  • White Linen card and blue gold paper from Craft Creations
  • Digi - Widow Bird Digital Stamp and Paper Pack by Coosty Creations
  • Dies - Spellbinder Grand Scalloped Ovals - 6 and Nestabilities Labels 20
  • Cuttlebug Embossing Folder
  • Pearls, lace, twine etc from my stash
I am entering this card into the following challenges:-