Followers

Showing posts with label 🏠. Show all posts

Thursday, March 12, 2020

Tony I-Gnomey

The image used for this card is Tony I-Gnomey by Dr. Digi House of Stamps.


Toni I-Gnomey was coloured with Copics and I then added the background using Pan Pastels.  I don't often do 'no line' colouring but gave it a go here and then added some of the detail back in with a black fine liner.  The sentiment was printed digitally then coloured and fussy cut before finally being added to the image with foam tape.  For the card blank covering I used red Pan Pastels which I then fixed with Spray and Shine by Crafters Companion and finally stamped musical notes and the sentiment in black Memento ink.  The stamps are really old and collected from a magazine (I kept the stamps and chucked the magazine out so alas now I don't know the company to give them the credit grrr).


I am entering this card in the following challenges : -


Thursday, March 5, 2020

Trotsky

The image used for this card is Trotsky by Dr. Digi House of Stamps.


I coloured this adorable Scottie dog with Copics and added the text digitally (before colouring).  The card base covering just had to be red tartan as in my mind the two go together perfectly.    I thought I would try and be a bit clever (which in my case is not the best idea hahaha) and add and inlay die border to balance the position of Trotsky on the card.  Quite happy with the die I had found and it fitted perfectly I set to die cutting, where my brain cell was I don't know, maybe gone for a coffee.  The die was a regular border die and not an inlay die haha, oh well, not the the end of the world, I just placed the now 2 sections back together again but had to hide the slight off cut on the outer edge with a couple of black glitter dots.  To finish off the card was a leap of joy from me hahahaha - I had forgotten I had this bit of red tartan ribbon and then to find it was the same tartan I had used for covering the card was just too much self control in containing my delight :) :) :)


I am entering this card in the following challenges : -


Thursday, January 16, 2020

Caligula

The image used for this card is Caligula by Dr. Digi House of Stamps.


I coloured Caligula with Copics the masked him so I could use Distress Inks to blend the background.  Next with Caligula still masked I stamped the xoxoxox heart stamp in red Memento Ink.  Sentiment and image layer were then mounted on black then red before being attached to the card with foam tape.  To finish off black flat back pearls and a red heart.  Simple but I do love how this turned out.

I am entering this card in the following challenges : -


Thursday, January 9, 2020

Schrödinger Pyrography

The image used for this card is Schrödinger by Dr. Digi House of Stamps.


Something a little different from colouring this week.  Time to play with the pyrography iron again and make a picture using Schrödinger by Dr. Digi House of Stamps.  I designed my picture on Illustrator as I find this the easiest program for this type of work.  Once I had the designing done I reversed everything and printed.  Next I sanded down an A4 sheet of plywood I had and placed my reversed image printout in position so I could use acetone to transfer the lines to the wood.  This is such a cool technique and lends itself wonderfully to placing digital images onto wood.  Once the transferring was done I removed my paper and completed the picture.  I am only a very basic pyrography creator and shading is not something I really do, much more just line work so this was a challenge and a half and the opportunity to play with several different tips.  Once I reached a point that I thought I better not do any more (knowing when to stop is pretty hard at times), I then stained the wood with some brown ink diluted with water and then rubbed down with a wet one, this brings out the grain of the wood a bit more.  Hope you like the end result and I bet all you lovely cat owners are having a bit of a laugh over the rules lol

I am entering this card in the following challenges : -
  • Fab n Funky W,1E, #463 - No Designer Paper
  • Show us Your Pussies - M, Cat Only Challenge-  January -  Furrything Goes/ Happy Meuow Year
  • Make My Monday  (2W, Top 3, 3E) #113 ANYTHING BUT A SQUARE (Week 1) 
  • Crazy 4 Challenges W,1E - #516 - Try or Use Something New  - PYROGRAPHY SHADING
  • Alphabet Challenge - 2W, 1E -  T IS FOR TRY SOMETHING DIFFERENT (Product/Technique)  (W1 of 2)  - PYROGRAPHY SHADING


Thursday, January 2, 2020

Desmond the Dodo

The image used for this card is Desmond the Dodo by Dr. Digi House of Stamps.


Such a fun image and equally as much fun to colour which was done using Copics.  Desmond was fussy cut and placed on the prepared background which I had created using Distress Inks. The text was printed on my image layer before colouring and the Happy Birthday was also printed before being coloured.  3 strips were finally cut, coloured and the black Memento used to stamp the textures on.

I am entering this card in the following challenges : -


Thursday, December 26, 2019

Christmas Chris

The image used for this card is Christmas Chris by Dr. Digi House of Stamps.


I hope you have all had a magical Christmas and not suffering too much today.  Poor old Christmas Chris is going to have belly ache I think as he is still tucking in to yesterdays leftovers lol.
Design paper was used to back the card I created a circular frame with my die cutter using gold card which I placed the design paper behind - alas this looked really bad, so fussy, so I coloured the holly and berries in to tone it down a bit.  Christmas Chris digi was coloured with Copics and fussy cut and a pre printed sentiment was used along with pre cut holly leaves to decorate.  Simple strips of gold glitter paper were used to frame the card.

I am entering this card in the following challenges : -


Thursday, December 19, 2019

Elliot & Elvis

The image used for this card is Elliot and Elvis by Dr. Digi House of Stamps.


 Merry Christmas everybody, hope it is a wonderful one for you full of happiness and wonderful memories :).

I coloured the image with Copics and fussy cut it ready to added to my card.  The card base was covered with design paper then I added a red mulberry paper layer, do love how the transparency here allows the Christmas trees of the backing paper to shine through.  The text was designed on SCAL with the shadow layer matching the backing paper and the sentiment on top cut out of sticky back felt.  I do love a bit of touchy feely on cards lol.  I finished off the coloured image with some gold glitter for a bit of sparkle too then attached it to my card.  Simple but effective I think.

I am entering this card in the following challenges : -


Thursday, December 12, 2019

Caffinated-Craig

The image used for this card is Caffinated-Craig by Dr. Digi House of Stamps.


 For this thank you card for Barry our builder I have used a photo taken just after the kitchen / dining room wall was knocked out.  Barry really deserved a cake and cup of tea after that lol.  The image is really a guy in his home lounging clothes and slippers but a bit of creative colouring changed his slippers into work boots I hope and although Barry did not wear clothes like this to work the actual image looks so like him :)   I coloured the image with copics and embossed the silver backing paper with a brickwork folder (think I got that the wrong way round but cool effect anyway).  Hubby made me the big hammer with his 3D printer and I coloured it with acrylic paint and finally I foil embossed the Thank You Barry using the WRMK foiling tip which can be used with a die cutter.  I designed the label and text using SCAL and print/foiled with my Silver Bullet.

I am entering this card in the following challenges : -


Thursday, December 5, 2019

Man About The House

The image used for this card is Man About The House by Dr. Digi House of Stamps.


This thank you card is for Leo who has done a tremendous about of joinery work in my Mum's house during a major renovation.  I used wood design paper to cover the card base and a digital version of wood flooring paper behind the image.  The image was coloured with Copics and hubby printed the border for me with his 3D printer and I then painted it with acrylic paints.  The die cut border on the right was a pain in the you know what lol - it is cut using a very thin layer of wood veneer, the first time I tried it was hopeless so I glued the wood to some thick paper and cut again.  It sort of worked but if you look closely you can see where the wood has lifted off, obviously where the glue has not held, never mind, it adds character.  The label was created with the hot foil attachment from WRMK using my Silver Bullet and designed on SCAL software.

I am entering this card in the following challenges : -


Thursday, November 28, 2019

I.T. Ian

The image used for this card is I.T. Ian by Dr. Digi House of Stamps.


This thank you card is for Tommy who has totally rewired, moved electrical sockets and done a bunch of other things during the rewiring of my Mum's house. The image was coloured with Copics and hubby printed the sockets for me on his 3D printer.  The one odd copper one is because all the sockets in the house are white with the exception of the kitchen where I have a copper theme going on and so had to have a copper switch (a light switch not a socket but never mind).  The sentiment was created with the WRMK foil pen which I used with my Silver Bullet after designing the label using SCAL software.

I am entering this card in the following challenges : -


Thursday, November 21, 2019

Dunderton Decorators Ltd

The image used for this card is Dunderton Decorators Ltd by Dr. Digi House of Stamps.


This thank you card is for Rocco who decorated my Mum's house.  Not only did he do the decorating which is his main profession but he also assisted Barry the builder throughout the whole renovation which has taken about 3 months.  I coloured the image using Copics after printing him on a paint chart background.  For the backing paper I used a teal/green colour plain paper to match the colouring on the shirt and then stamped paint blots with emerald green then added flicks of yellow paint.  This was then embossed to add a bit of texture.  Hubby printed the paint cans for me on his 3D printer and I then painted them with acrylic paint.  The label was made by heat foiling using the WRMK heat foiling attachment which can be used with an electronic die cutter.

I am entering this card in the following challenges : -


Thursday, November 14, 2019

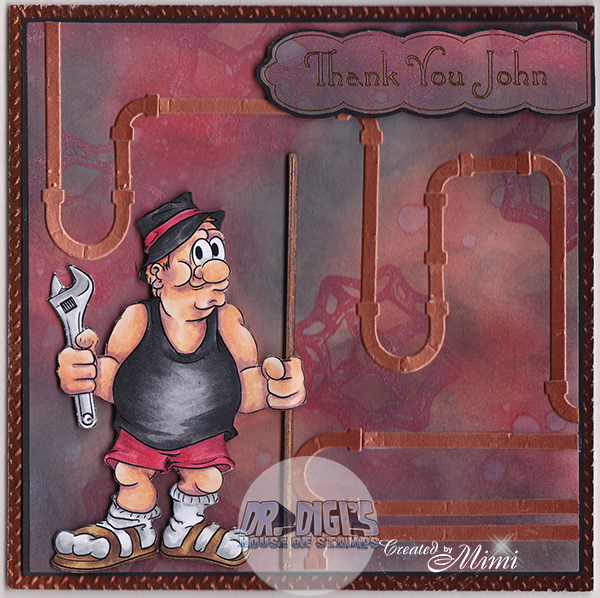
Gardening Gus

The image used for this card is Gardening Gus by Dr. Digi House of Stamps.


This thank you card has been created for John who is the plumber and done some amazing work in the renovation of my Mum's house.  He has put in a new kitchen for me, a bathroom too and moved heating radiators to new locations to make way for walls being knocked out and large window changed to a patio door.  The image is really a gardening guy so after I printed him I then fussy him and removed the hose pipe from his right hand and hoe from his left hand, these were replaced with a fussy cut adjustable spanner and a 3D printed pipe which I covered in copper powder.  The other copper pipes are Memory Box die cuts and the label was created by heat foiling using the WRMK hot foil pen which works with an electronic die cutter, the text and label design were created using SCAL software before being sent to my cutter.

I am entering this card in the following challenges : -


Thursday, November 7, 2019

Katy the Cat Lady

The image used for this card is Katy The Cat Lady by Dr. Digi House of Stamps.

We have to gorgeous cats, Russian Blues and such gentle natures and so calm too.  They are brother and sister, the boy is call Jeeves and the wee girl is called Bree.  So many of my friends have pussy cats, often it seems, a house full lol so the term Crazy Cat Lady often floats about hahaha.  When I saw this digi the crazy cat lady was just about all I could think about.


For this card I designed the text in Ilustrator and saved it as an .svg file which I then imported into Sure Cuts A Lot.  I love the versatility of creating my own die cuts this way as I can achieve the proportions etc. that I want.  I know many folks design their cutting files directly in SCAL etc. but I fund the software a bit cumbersome to use and my way works for me lol.   I coloured the image with Copics and fussy cut her then added to the die cut circles/text layer.  The background was created by rubber stamping cat images and for the centre circle behind the digi I also added embossing for a bit of texture.

I am entering this card in the following challenges : -


Thursday, October 31, 2019

Hairdresser Hannah

The image used for this card is Hairdresser Hannah by Dr. Digi House of Stamps.

Such a fun image to colour :)   I used a digital background which I printed very lightly and then coloured the areas with Copics.  The image was also coloured with Copics. A simple card design wise but love how bright and cheerful it is :)


I am entering this card in the following challenges : -


Thursday, October 24, 2019

Cuddly Critter Cow

The image used for this card is Critter Cow by Dr. Digi House of Stamps.  Who does not like a fun cow hahahaha.  I coloured the image with Copics and designed the cow backing paper using a seemless tile in Photoshop.  For the sentiment I used the cow's udder and enlarged it then added my text digitally before printing.


I am entering this card in the following challenges : -


Thursday, October 17, 2019

Dunderton Academicals FC

The image used for this card is Dunderton Academicals FC by Dr. Digi House of Stamps. This card seemed to give me one headache after another.  I should have engaged my brain more but the battle was good for the old brain cells which is a bonus.  I removed the stripes from the t-shirt as they were horizontal and for the local football club in my area the stripes needed to be vertical so I drew them in again in the correct direction.  The colours of the team are Black and Gold so it was an obvious choice to use those colours.  I did not want a plain green background to made that using alcohol inks and then die cut the goal posts and used black thread to make the netting which seemed to take me ages and was so fiddly.


I am entering this card in the following challenges : -


Thursday, October 10, 2019

Comfy Caterpillar

  The image used for this card is Comfy Caterpillar by Dr. Digi House of Stamps.  I used a digital background which was free and just so perfect for this card and the sentiment I wanted to use (naughty I know lol).  The sentiment was created digitally and I filled the font with a tile pattern I made to represent the toadstool.  I also printed the backing paper with the same tiled pattern.  Comfy Caterpillar was printed and fussy cut before colouring him with Copics.  I printed some extra grass area from the background paper and cut that out so I could place it in front of the Comfy Caterpillar who was attached to the card with foam tape for a bit extra dimension to this card.


I am entering this card in the following challenges : -


Thursday, October 3, 2019

Two Fat Boys

Time to share another Dr. Digi card.  This week I have used the image Two Fat Boys.  I had so many ideas for this card but it took me 3 goes to end up with a result I liked - oh how I love a challenge.  In the end it was hubby who came to the rescue with the sentiment, think this is the first time he has come up with something as normally I get - 'can't help' hahaha.  So many bikers want a Harley but with being British I am support British made and suggesting a Triumph would be a good choice, especially as the Harley here has broken down and one fat boy has had to get his spanner out to fix the problem hahaha.


The background is a free digital creation and I placed the fat boys on top before printing.  I coloured the image mainly with Copics then used a black Prismacolour to darken the black areas.  For the bike I used grey Copics then coloured over with a silver Prismacolour so in the light you get a feel of shiny chrome.  Next was a rummage amongst my dies for a spanner which I knew I had but it was a bit big for the card so next was the charms box to see what was lurking in there - lucky find the perfect spanner which I attached to the card with some black chain fed through an eyelet :)


I am entering this card in the following challenges : -


Thursday, September 26, 2019

Fast Food Frankie

Time to share another Dr. Digi card.  I love karma as I am not a great fan of confrontation and would much rather sit back and hope life gets it own back on the offender in one way or another.  So, for my card this week I have used the fab image Fastfood Frankie and linked him to karma as sometimes a long wait for karma to take place is a bit of a pain hahahaha.


I designed the backing paper digitally then used the same symbol I used to create the pattern and converted it to a drawing so I could save it as an .svg ready for my die cutter.  The same karma symbol was also used to create the border for the sentiment.  The image was coloured with Copics and placed on the card with foam tape.  I am not sure if I really like this card or not, hoping it will grow on me or is it karma getting its own back for me having mean thoughts :) :) :)


I am entering this card in the following challenges : -


Thursday, September 19, 2019

Morag the Moo

Todays card uses the  image Morag that Moo by Dr. Digi House of Stamps.    Oh how I love highland cattle, there really is something so special about them and their stunning coats.


Morag was printed, coloured with Copics and then fussy cut and placed onto the watercolour background which I created with watercolour pencils.  Next I designed some backing paper using the Morag the Moo image and a tiling program I have called Patterno - certainly a task as I wanted the colours to match the coloured image so opted to print the background paper in black and white and then colour with Copics.  I did think of creating the backing paper with Morag fully visible and identifiable but rather liked the effect of the pattern, not obvious at first glance but something that will be noticed by the recipient at some point :).    Oh such a bad sentiment but hopefully you will take it as a bit of fun as it is pretty common slang where I live and not meant in malice.  To finish the card I mounting Morag and her background on plain black and then added the four die-cut corners.


I am entering this card in the following challenges : -