Followers

Tuesday, June 3, 2014

The Book Thief

Time for another challenge over at

SONG/FILM TITLE

Morning folks, hope you are having a good day today :)   It is week two of the IKEsWORLD challenge, Song/Film title and still plenty of time for you to enter.  Just remember, you must use and IKEsART image to be eligible for the prize.  Why not pop on over to the store, Ike produces the most amazing stamps, everything from off the wall to cute and fluffy :) :) :)

For this creation I used the digi Raven Poe by IKEsART.  I can almost hear you saying where is this going in relation to the them, sorry, think I was off my trolly when I was creating this lol.  I started off making a wee book, and inside the book I wrote 5 pages of bits and bobs for my mother, thing like reminding her of the day we were parked on the side of the road eating a bag of cherries.  I asked her to wind down her window (she was the passenger) and I spat my cherry stone out.  Naughty me and I was waiting for a ticking off for being so disgusting but instead my Mum copied me.  What fun and we had such a laugh trying to see who could spit their cherry stone the furthest.  Yes, keep the child inside alive is so important hahahaha.  The book was  coloured with chalk inks and decorated with the Raven Poe digi which I fussy cut, gems and gold embossing powder.  A rather cryptic title to the book was also written :)
I created some backing paper for this project using text from the book I am using as my theme in Photoshop then added some splats, just for character.
 I was thinking the other night that I love embossed paper but sometimes I don't want it all over the piece of paper.  Also, I have a lot of 6x4 inch folders which do nothing as they don't fit my cards.  Brain wave - wonder if using a hammer or rolling pin and bashing the folder only where I wanted my paper embossed would work - Yep it did and something I will remember for the future.  Anyway, my rolling pin in the kitchen sits in the drawer never seeing the light of day, far better to have it in my craft room :)
I printed my sentiment and a border using Spellbinders Scalloped Circles and  Sizzix Thinlits Die  then coloured in the same way as I did the book.  To finish off I added loads of glass gems for that really sparkly bit of bling.
 Time to play with my background paper.  Fancying some rubber stamping I raked out a book stamp I have and using the pink embossing powder which is almost transparent I put books all over the page.
 Finally I distressed the edges.  Oh I love this piece of paper, it turned out exactly as I hoped it would.
 Time to assemble.  Using a bit of clipart from IClipart.com of a thief, I fussy cut him and mounted him on my card.  The book was placed on his back - so do you get it now (bit of a hint on the sentiment)  - the film I am depicting is The Book Thief - extract from Wikipedia - The Book Thief is a 2013 American-German war drama film directed by Brian Percival and starring Geoffrey Rush, Emily Watson, and Sophie NĂ©lisse. Based on the novel of the same name by Markus Zusak and written by Michael Petroni.  If you have not seen this film I highly recommend it, one of those memorable films.

My plan is to give this rather odd, cryptic card to my mother with a copy of the book 'The Book Thief', she loves reading and I think she will really enjoy the story.  Now I hope with the explanation this creation now makes sense :)


Ingredients:-
  • Raven Poe by IKEsART
  • Clipart from IClipart.com
  • Dies - Spellbinders Scalloped Circles and  Sizzix Thinlits
  • Colour Box Chalk
  • Gold and Pink Embossing Powders
  • Cuttlebug Paisley embossing folder
  • Gems, ribbon etc from my stash
I am entering this project into the following challenges:-

Monday, June 2, 2014

Behold the Lamb

Sweet Pea Stamps

Hello folks, here I am again with another creation for  Sweet Pea Stamps.  Today I am sharing with you my DT creation using the digi Behold the Lamb by Katerina Koukiotis

I am still on my family Christmas card mission and this one is for my Mum :)

I started off by colouring the digi in my Mum's favourite colours, blues and mauves.  Once coloured I fussy cut her (the digi that is, not my Mum hahaha)
 Promarkers used to colour the image
Next I cut some blue stiff paper to form the cascades in my Tri-Fold Cascade card.  I plan to use just blue and gold for the background folds so on one section on each side I used my rolling pin and a snowflake embossing folder.  By doing it this way I can control where the embossing is.
Next I dapped over the top with gold stamping in.
On another section I used gold embossing powder - it look a bit messy here but the end result on the card is what I was after.
I covered the base of the card with the same blue stiff paper that I used for the cascades and then, using adhesive spray overlaid with some semi transparent and gold swirl wrapping a friend gave me which was the wrapping on some flowers she was given.  Yep, my friends are pretty good a passing all their bits of wrapping etc. onto me :)
 I have been playing around using think metal sheets and dies, I love the effect of the metal.  Here I have used gold metal sheet and the Crafty Ann Flourish-5 die.
 Final bit to do before finishing off was the bow.  Using ribbon to match the blues and mauves in the digi colouring and metal wire to hold the bow tight I did not want to waste the ends so wrapped the wire bits around a toothpick to make spirals.
 And here we have the finished card.  I have used gold line stickers around the front edge and a peel off sentiments.  Three gold flowers were also added, they came from another friend who found them attached to a box of chocolates that somebody had brought into work.  A fair bit of recycling going on in this card :) :) :)
Side view
 Front view

Thank you for stopping by :)
Ingredients
  • Digi Behold the Lamb by Katerina Koukiotis available from Sweet Pea Stamps
  • Dies - Crafty Ann Flourish-5 die
  • Promarkers
  • Ribbon, flowers, peel off stickers, material and embossing powder from my stash
Challenges entered

Sunday, June 1, 2014

Busted

Hello folks.  We have another challenge at One Stitch At A Time so how about popping over to see all the fabulous creations by the design team.

Challenge #215

Theme 'Boy'ish' 

The sponsor is StitchyBear Digital Outlet with a 7 image June prize pack. To win main prize you MUST use an Image from our store. Runner up prize for person using none store image is $3 to spend in the StitchyBear Digital Outlet. So everyone can win something ;O).

This week I am working with the digi - Busted by Stitchy Stamps available in the Stitchy Bear Digital Outlet.
A dilema hahaha Boyish theme and a Christmas digi, am I in my comfort zone - no, far from it.  I have to admit though I love the challenge of working out my comfort zone, stimulating the old grey matter hahahahaha.  To begin with I coloured the digi, mounted it on black card as I colour on paper and for this creation I needed strength.  So looking forward to getting hold of some decent card to colour on when I return to the UK in a couple of weeks.  The image was then fussy cut.
Once cut, I had a whale of a time embellishing.  Gold Stickles for the dog collar, White Lace Stickles for Santa's furry bits and Ice Stickles for his hairy bits.  The dog also had googlie eyes added too (this seems to be a bit below the held with the language I am using - I do apologise lol)
 Promarkers used to colour the image
Next I used a Winter Tree cutting die from Treasure Box, part of a winter them set I bought a couple of years ago.  The sections were air brushed with Promarkers.
 Once assembled more Stickle play time and to finish off a pre cut star for the top of the tree.
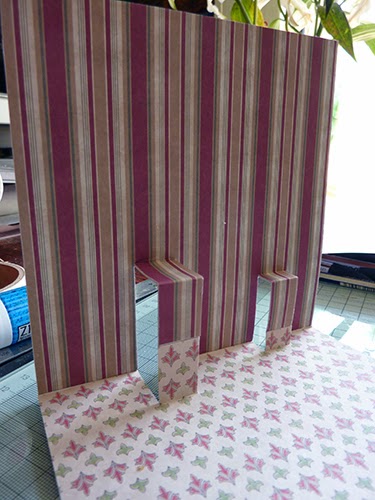
 Now for something new, not made one of these before.  I used Papermania Christmas paper and worked out where to cut to form 3D tabs to stick Santa and the tree on.
 To make the window for the background I used some starry night vellum mounted on card and white peel off line sticker to make the window frame and panes.  A bit of green material for the curtains and a pelmet using the same backing paper to finish off.
 Now you can't have a Christmas tree without a few wee gifts under it so I cut some rectangles out of card, coloured with Promarkers and decorated with glitter pens.  Finally some gold and green twine for a bit more bling.
Once all the elements for the inside of the card were made I assembled them in the locations I wanted and added a couple of die cuts to represent a carpet and also the plays a message can be written later.

OK, so I have a Christmas card but it is not in the least boyish, how do I get around this??????  I covered the front and back of the card with another layer of red card which I embossed with an A4 Embossilicious folder and then made some sports balls - oh dear there I go again lol.  Luckily SCAL had a rugby shaped ball in the library, I think it is an American football but look enough like a tradition old style rugby ball for me to get away with it.  Alas no football so I had to design that, another challenge it itself.  Each ball is about 2cm squared.  6 of each type of ball was cut and I will used these to decorate the front of the card and I hope a good link to the Boy'ish theme of this weeks challenge.
  View of the front of the card
Side view of the card showing the 3D elements in position
Proper view of the inside of the card

Ingredients:-
  • digi - Busted by Stitchy Stamps available in the Stitchy Bear Digital Outlet.
  • dies - Spellbinders Grand Labels 1
  • Tree Die from Treasure Box Designs
  • Promarkers
  • Stickles
  • Material, vellum, peel off stickers, from my stash
I am entering the following challenges

SPS - Sandcastle Note Card

Sweet Pea Stamps

Hello folks, here I am again with another creation for  Sweet Pea Stamps.  This is my DT card for the June Challenge - Hit The Beach.  Head on over to One Sweet Challenge to join in the fun <g>

I used the image Sandcastles by Elizabeth Bell (this image is only available as a rubber stamp)
I started by making the box to hold the note paper.  This was cut with white card and then covered with water vellum.
 Next I made the side pieces for the base of the note card using Memory Box Big-Splash border cut in black and then I trimmed off the excess which I did not need.
The digi was coloured with Promarkers.
I cut my card blank and covered in blue water vellum and also a scalloped circle backing using Spellbinders Grand Scalloped Circles.  With all the bits assembled time to finish off the rest of the embellishments. I printed a second circle with the quote "History is a child building a sand-castle by the sea, and that child is the whole majesty of man's power in the world" - Heraditus, to go behind the digi.
 I painted the shell and fish buttons with Extreme Glitter.
 the pencil too was covered in Extreme Glitter.  Next I made a pencil charm with the fish button and some beads.
 The shells were attached to the card in one small pile.
 And here we have the finished creation.

Thank you for stopping by :)

Ingredients
  • Sandcastles by Elizabeth Bell (this image is only available as a rubber stamp)
  • Promarkers
  • Dies - Memory Box Big Splash, Spellbinders Grand Circles and Grand Scallop Circles
  • Beads, buttons and vellum from my stash
Challenges entered

Monday, May 26, 2014

SPS - Gardenia

Sweet Pea Stamps

Hello folks, here I am again with another creation for  Sweet Pea Stamps.  This week is Featured Artist week.  The whole DT are creating with images by Rebecca Sinz and I have chosen to use the fabulous digi Gardenia.
To begin making this card I first designed and die cut the font panel.
 Next I coloured some lace with my Promarker.
 The lace was attached to the back of the die cut lattice front and also the inside of the card as part of this will be visible in the end design.
Liquid Pearls which I applied on each of the cross sections of the lattice.
 While the Liquid Pearls were drying I colour the digi with Promarkers
I then mounted the digi onto Mulberry paper which I had used the water method to created a frayed edge.
 Now onto the flowers - grrrrrr - what grief.  I wanted white flowers so first tried with copy paper but that looked flat, then tried with hand made paper, that looked great but not white enough.  Time to put the thinking cap on - ah!! white Mulberry paper.  Perfect colour and so delicate in appearance but with this fine paper pretty fiddly to do.  I used Spellbinders Bitty-Blossoms-6.
Next I used Spellbinders Nestabilities-Labels-20 for the inside of the card.  This was edged with Derwent Blendable crayons and Promarker.
 I assembled all sections of the card and added some luscious green leaves to accompany the hand made gardenia.  Here we have a view showing the inside of the card
and here is the front of the card showing how the lattice panel is held in a curved way, locked in place by the gardenia and leaves at the side.
Thank you for stopping by :)

Ingredients
  • Digi -  Gardenia by Rebecca Sinz available from  Sweet Pea Stamps
  • Die - Spellbinders Bitty-Blossoms-6 
  • Promarkers
  • Liquid Pearls
  • Lace, mulberry paper, leaves and gold peel off line stickers from my stash
Challenges entered