Followers

Tuesday, June 16, 2015

Earth, Wind, Fire and Water!!!!!!

Time for another challenge over at

Challenge 40
Earth, Wind, Fire and Water

Welcome back to the IKEsWORLD challenges :)  do pop on over to IKEsWORLD to join in the challenge, just remember, you must use and IKEsART image to be eligible for the prize.  Why not pop on over to the store too :), Ike produces the most amazing stamps, everything from off the wall to cute and fluffy :) :) :)

Talk about a challenge to get you thinking - this one did the trick and another out of the box creation from me hahahaha.

I asked Ike to draw me an image of a gardener for my idea (at the time of writing this post the image is not in the store).  The gardener represents Earth, well what better way to play with the earth than to plant and grow something.  I wonder how many folks have bent over and - woops - a little air pops out giving one the shock of ones life hehehe, well that is exactly what happened to my gardener.  Now for the fire, well that is easy, that methane is flammable as far as I know (but not learnt from experience I should add). What could be handier in a garden than a sprinkler to put out the fire and there we have it Earth, Wind, Fire and Water, an odd take on the challenge theme but I had so much fun :) :) :)

To begin with I made a wee sprinkler out of Sculpie, once it was cooked I coloured it with a silver paint pen and a green Promarker. I do apologies for the blurred pic - got a bit close with the camera as it is so small.
 Next I designed my dp and used a clipped section to add the .png version of the image which I then coloured my image with Faber Castell Polychromos pencils.  Other sections of my card were also printed.
To make the smelly wind I cut some thick vellum in the shape of a gust of wind and used some petal dies for the flames which I coloured with Promarkers.
 With the 'hot air' and flames in place I added my sprinkler and used Crystal Stickles to represent the water.  For the hose pipe I used a large green paper clip cut and bent to the size and shape I wanted.
 Inside of card
I mounted my image mat on green card and outlined in green peel off stickers.  The leaves in the background were die cut with Marianne Design Craftables - Branch2 and I used Spellbinders Scalloped Circles and Circles for the sentiment topper.  Finally the text 'You're in your ELEMENTS was added'.  And there we have it, my out of the box creation for this challenge, hope you have had a bit of a giggle :)


Ingredients:-
  • image - not yet in store
  • colouring medium - Faber Castell Polychromos pencils and Promarkers
  • dies - Marianne Design Craftables - Branch2, Spellbinders Scalloped Circles and Circles
  • from my stash - DP by me, peel off line stickers, Sculpie, paper clip, Crystal Stickles, vellum
I am entering this project into the following challenges:-

Unicorn Dreams

Sweet Pea Stamps

Today is my day to showcase and image from Sweet Pea Stamps and I have chosen to work with the beautiful image Unicorn Dreams by Karen Middleton which is available from the Sweet Pea Store in both rubber and digi.

A friend has asked me to make a card with a white unicorn.  The unicorn bit is easy as I have this delightful image but white - now that is a challenge to me :) plus no fussy bits, just nice and clean.  Anyway I started by printing the image twice, once without a background which I will fussy cut late and the other with a background.  The top image was coloured with Promarkers in very light greys.
 I coloured round the edges of the image with grey just so if my fussy cutting was a bit off then it would not be white that showed through but grey which I hope will look like a shadow.
 For the card base I covered a piece of card with black velvet. My friend and her friend who this card is for are both none fussy people so no lace or bling on this card hahaha.  Instead, to go with the texture of the black velvet I am adding some hessian (burlap) which I have coloured with Promarkers again.
 With the image coloured I then added some Extreme Silver Glitter, it is not very obvious until the light catches is so not really bling but hopefully they will like the effect. The Extreme Glitter was added to the horn and the light sections of the mane.
 A simple finish to the inside of the card to make up for the Extreme Glitter.
 And the final touch, some brown ribbon and a name tag.

Ingredients:-
  • Image - Unicorn Dreams by Karen Middleton
  • Colouring Medium - Promarkers
  • Dies - X-Cut Labels
  • From my Stash - velvet, hessian (burlap), ribbon, Extreme Glitter
I am entering into the following challenges:-
Thank you for stopping by today and hope you have a happy crafting time ahead of you :) xx

Sunday, June 14, 2015

Pick-me-Up

Hello folks.  We have another challenge at One Stitch At A Time so how about popping over to see all the fabulous creations by the design team.  The prize this month is an awesome digi pack containing several images and a paper pack too - how cool is that.

Challenge #239

Theme 'Anything Goes with MEN

We all need to get some cards made for those men folk so here is your chance to share your creations with us for our fortnightly challenge.

For my design team creation I am using one of the images from Reece's Scrap Pieces Transportation pack - the pick-up and make an easel card using acetate.

To begin with I coloured the image with Faber Castell Polychromos.  I then mounted the coloured image on stiff card and fussy cut it out.
 Next I designed a warning sign and added some text.  For the metal pole I airbrushed with my Promarkers and then added some Frantage trying to make it look a bit old and rusty.
 Onto the card, I cut some white card which will be the inside of the card and then some acetate which will form the easel card on top of the white card base.  I do this as I find the acetate on its own not quite sturdy enough.
 After sticking the acetate easel section on top of the white card base I then covered it with some cool grass stuff I have which I think is used for railway models which I found in a stationary shop.  To add a bit of embellishment I pinched a few more wheels off my grandsons cars and then added a metal pick-up charm on top.
 The sentiment is pretty self explanatory :)


Ingredients:-
  • Image - Transportation pack by Reece's Scrap Pieces 
  • Colouring Medium - Faber Castell Polychromos and Promarkers
  • From my stash - green grass paper, wheels, charm and acetate
I am entering this card into the following challenges:-
Thanks for looking and hope you have a happy crafting day:)

Sunday, June 7, 2015

Nectar of Life

Sweet Pea Stamps

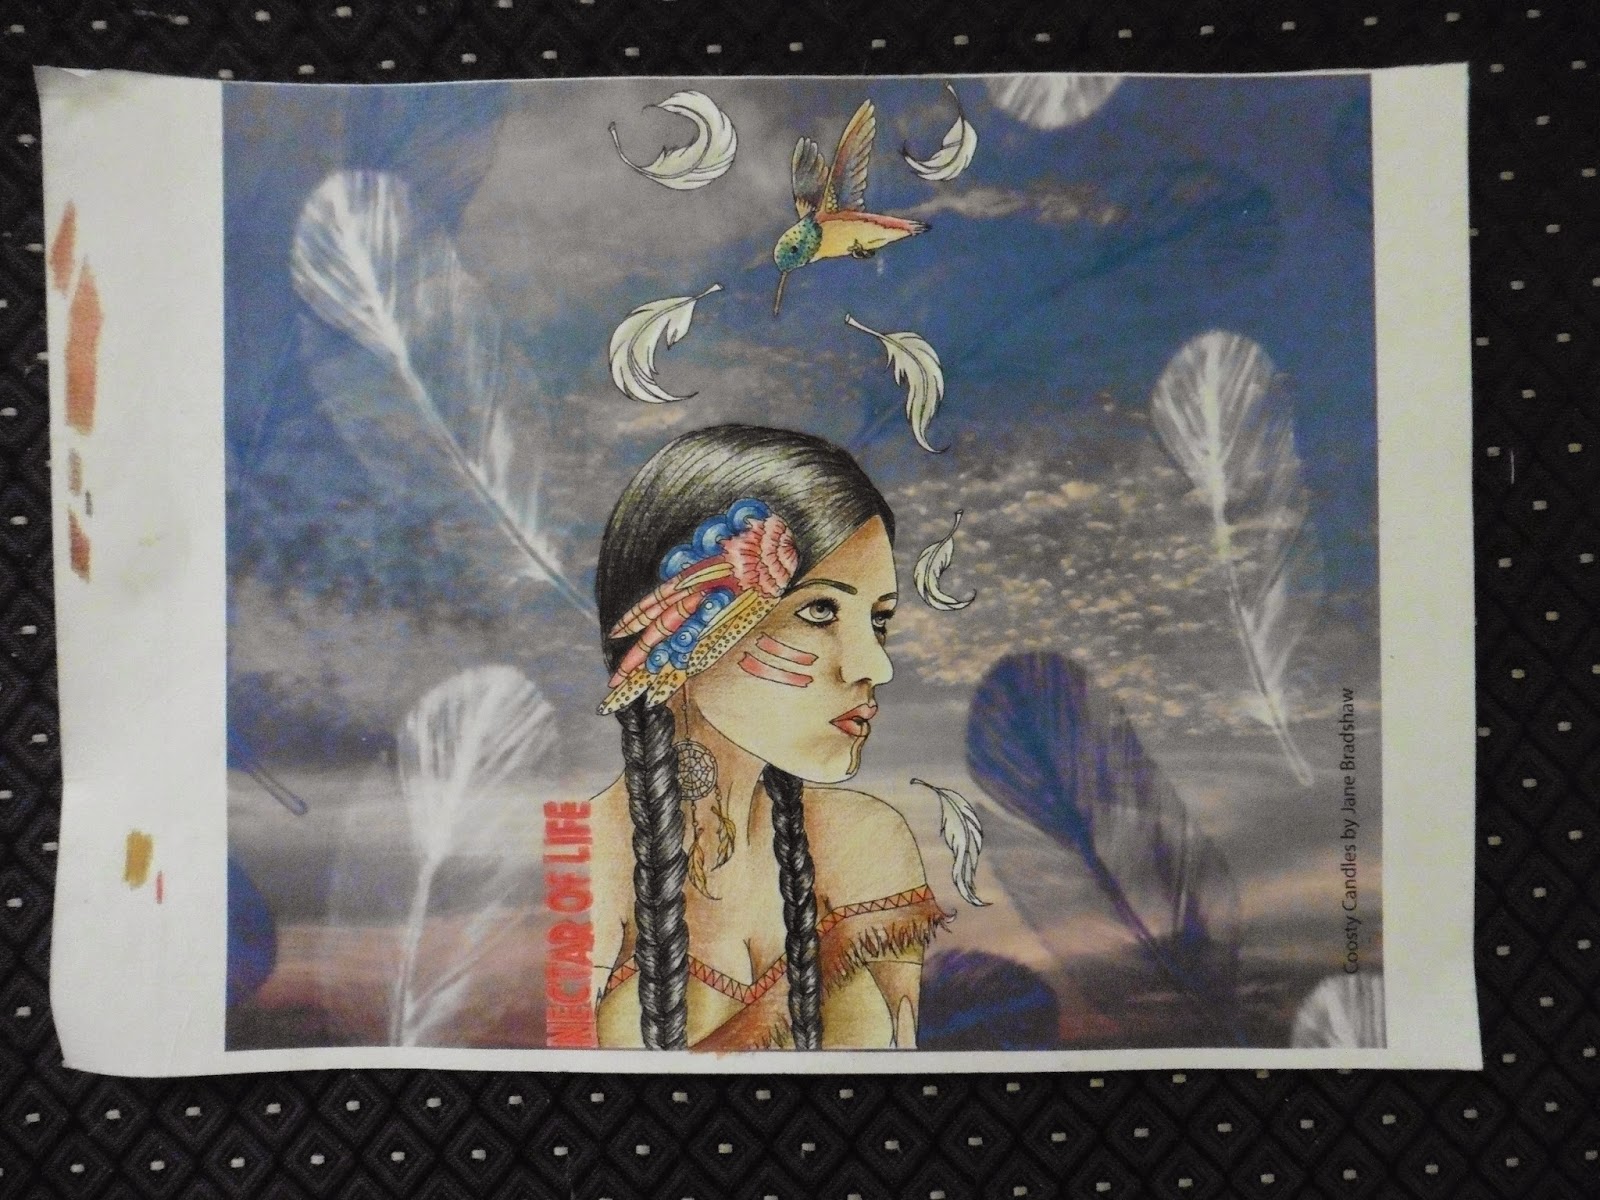
Today is my day to showcase and image from Sweet Pea Stamps and I have chosen to work with the beautiful image Nectar of Life  by Charmaine Flannery which is available from the Sweet Pea Store in both rubber and digi.  I so love decorating my candles and what a great feeling when just the right image is found :) :) I have a passion for Native American themed images so you can imagine I was in my element with this creation.

To begin with I printed my candle wrapper on tissue paper.  The image in the background is a photo and I added some feathers using a Photoshop brush by Obsidian Dawn.  Next I added the digi image and added the name of the digi to the left hand side.
The image was coloured with Faber Castell Polychromos coloured pencils.
I have a few wax strips which are for candles and I often use to finish off the top of the candle but today I am trying something new.  Using some wax sheet I bought ages ago and so far have not been able to work out what to do with them lol, I have tired using a small cutter today which I have for Silver Metal Clay work.  Worked pretty well and I cut loads of these wee ovals and used them to decorate the top of the candle to hide where the wrapper end.
Still feeling like experimenting I have used and embossing folder to make a light impression on the gold wax discs.  I did try pressing harder but then the discs clung to the embossing folder so that was not working.  Have to think of something else I can try in the future.
To finish off the candle I added some gold candle bronzing powder and some gold trim on the bottom edge.  Last job was to varnish the candle with candle varnish, a water based varnish especially for candles and fire safe. All parts, with the exception of the bottom trim are fire safe, I don't mind using something not so fire friendly at the base of the candle as this is a long way from the naked flame and I am sure the candle would be thrown away long before it burns to the area of the trim.  If you would like to see how I do my candles I have a wee video you can watch.  Candle Wrapper Video

Ingredients:-
  • Image - Nectar of Life  by Charmaine Flannery
  • Colouring Medium - Faber Castell Polychromos
  • Dies - I used a small cutter designed for Silver Metal Clay
  • From my Stash - Candle, candle varnish, candle gold bronzing powder, gold trim
I am entering into the following challenges:-
Thank you for stopping by today and hope you have a happy crafting time ahead of you :) xx

Tuesday, June 2, 2015

Spanish Dancer

Time for another challenge over at

Challenge 39
Lyrics
Give us a song to inspire us :) :) :) 

Welcome back to the IKEsWORLD challenges :)  do pop on over to IKEsWORLD to join in the challenge, just remember, you must use and IKEsART image to be eligible for the prize.  Why not pop on over to the store too :), Ike produces the most amazing stamps, everything from off the wall to cute and fluffy :) :) :)

Another candle from me for this challenge but I think it will be the last for a wee while as I seem to have made so many recently.  The song I have used for this creation is Spanish Dancer by Patti Scialfa - you can read the lyrics here and the image very fittingly is also called Spanish Dancer.


To begin with I designed the background on Photoshop and added another of Ike's images, a map of spain.  The next layer contained the lyrics from the song Spanish Dancer and on the final layer I placed the Spanish Dancer image with the white background removed.  The wrapper is now ready for printing and then I can finish the rest of the colouring.
The image was coloured with Faber Castell Polychromos and then attached to the Ikea 9" candle.  If you would like to see how I decorate my candles please have a look at the video :)


Here is the finished candle :) side views
Front view

Ingredients:-
  • Image -  Spanish Dancer by IKEsART
  • Colouring medium - Faber Castell Polychromos
  • From my stash - candle varnish, gold wax strip and the IKEA candle
I am entering this project into the following challenges:-
  • Turtle Soup Forum - D until 3rd Friday of the month - 1E per day -  Color Inspiration*

Steampunk Jessica

Hi peeps, hope you are having a good day :)

How exciting is this, I have been asked to be a Guest Designer for Through The Craft Room Door (TTCRD) and here is the card I have created.  The image I worked with is Steampunk Jessica from Little Blue Button.  Now this was challenging for me as I am hopeless at cute but I had lots of fun and that is the main thing.

To begin with I designed some Steampunk pipes and valves, backing paper and text which I cut with my die cutter.
 The backing paper was then mounted on green paper and layered onto my card.  The pipes were airbrushed with several layers using my Promarkers and a gold pen used to add the finishing touches.  I then added my text which was cut with vinyl and then added bead braid around the edges.
Next job was to colour the image and place her in the frame I had also made which had a lace backing but I didn't like this one bit so a quick change in direction.  Instead I made some tiny roses using yellow vellum and added one to a couple of bronze wing charms and pearl spay.
 Next I designed a tag and added a sentiment and then finished off with a bow and another vellum rose..  The tag slides into a wee pocket embellished with another two wing charms and a opal brad.
 More of the design papers were printed for the inside of the card.
 And there we have it, my Steampunk pips card to match Steampunk Jessica in all her glory.
Ingredients:-

  • Image - Steampunk Jessica from Little Blue Button
  • Colouring Medium - Promarkers and Faber Castell Polychromos 
  • Dies - steampipes by me, XCut tags and Spellbinders Bitty Blossoms 6
  • From my stash - charms, pearls, vinyl, ribbon, brad and bead trim
I am entering this creation in the following challenges:-

Monday, June 1, 2015

Wonderland

Good day folks :) Today I am sharing a card I have made using the fab image Wonderland by Molly Harrison available from Sweet Pea Stamps as a digi

To begin with I coloured the image with Promarkes, Faber Castell Polychromos and then used chalks for the background.

I then created my card blank  and stamped a cherry blossom rubber stamp onto mauve paper using a embossing stamp pad.  Chalks were used again in a mixture of colours to tone in with the image.

Next I took the contrasting colour - burgandy, and created the frame by using the border die from the Sizzix - love, birds and hearts set.  The butterflies and rose were made using vellum and Spellbinders Bitty Blossoms and Cherry Lyn Designs mimi butterflies.  To finish off I added a blue bow and several gold metal stars.  The inside of the card was created with more of the design paper I made, the border die and some more gold stars.  To make the cut out design I used the Crafts Too floral flourish die and the section that was cut out was added to the front of the card with a spray of pearls.


Ingredients:-
  • Image - Wonderland by Molly Harrison
  • Colouring Medium - Promarkes, Faber Castell Polychromos and then used chalks for the background
  • Dies -  Sizzix - love, birds and hearts set.  The butterflies and rose were made using vellum and Spellbinders Bitty Blossoms, Cherry Lyn Designs mimi butterflies and Crafts Too floral flourish die 
  • From my Stash - gold stars, chalks, pearls, ribbon, 
I am entering into the following challenges:-