Followers

Showing posts with label rubber stamp. Show all posts

Monday, June 29, 2015

Mother and Baby GIrl

Sweet Pea Stamps

Today is my day to showcase and image from Sweet Pea Stamps and I have chosen to work with the beautiful image Mother and Baby Girl  by Conie Fong which is available from the Sweet Pea Store in as a digi and in rubber.

This card is for a friend of mine who is just about to have a baby girl in the next week or so.  She is keeping very quite about what she and her hubby are going to call their baby daughter so I couldn't add the name to the card lol.


To begin with I coloured the image with Promarkers

Using the colours I have chosen I am trying to have a vintage feel to this card but the mum to be is far from girly or vintage.  She does wear a lot of fawn colours so I am hoping with all the lace etc I am adding to the card she will still like it.  Maybe I can call it funky vintage lol.

To make the frame for her I used the die cArt decorative Oval Frames and then attached white lace behind the frame which I ruffled.  A couple of flourishes were cut using Crafty Ann -Flourish-5.  All these sections were airbrushed with Warm Brown 5, 4 and 3 Promarkers.
For the card base I used brown paper and then pink card which I embossed with a Tattered Lace embossing folder. Some rather special lace was added along the bottom. Next onto the digi, with her
coloured I then fussy cut her.   Some lace I had which was the perfect colour was placed at the back of part of the frame and then up to the top left edge of the card.  I made some roses from hand made paper using the Spellbinder die Bitty-Blossoms-6 and then added a pram charm, baby girl ribbon bow and some pearl strands.  Liquid Pearls were added along the bottom of the Mums dress to hide the join where it meets the frame and to balance the out I also added some Liquid Pearls to the lace edges of her dress and the babies dress.
 The inside of the card was finished of with some design paper I had floating around and the writing area created with die Sizzix - 657914 which I then air-brushed with my warm brown Promarker.  The flourishes on the front were a bit big for what I wanted so I had trimmed them down, no point in wasting anything so I placed them on the inside :) :) :) .


Ingredients:-
  • Image - Mother and Baby Girl  by Conie Fong
  • Colouring Medium - Promarkes and chalk (chalk was used for the flowers)
  • Dies -  cArt decorative Oval Frames, Crafty Ann -Flourish-5 and Spellbinder die Bitty-Blossoms-6 
  • From my Stash - lace, charm, peel off sticker sentiment, peals sprays and ribbon
I am entering into the following challenges:-
Thank you for stopping by today and hope you have a happy crafting time ahead of you :) xx

Tuesday, June 16, 2015

Unicorn Dreams

Sweet Pea Stamps

Today is my day to showcase and image from Sweet Pea Stamps and I have chosen to work with the beautiful image Unicorn Dreams by Karen Middleton which is available from the Sweet Pea Store in both rubber and digi.

A friend has asked me to make a card with a white unicorn.  The unicorn bit is easy as I have this delightful image but white - now that is a challenge to me :) plus no fussy bits, just nice and clean.  Anyway I started by printing the image twice, once without a background which I will fussy cut late and the other with a background.  The top image was coloured with Promarkers in very light greys.
 I coloured round the edges of the image with grey just so if my fussy cutting was a bit off then it would not be white that showed through but grey which I hope will look like a shadow.
 For the card base I covered a piece of card with black velvet. My friend and her friend who this card is for are both none fussy people so no lace or bling on this card hahaha.  Instead, to go with the texture of the black velvet I am adding some hessian (burlap) which I have coloured with Promarkers again.
 With the image coloured I then added some Extreme Silver Glitter, it is not very obvious until the light catches is so not really bling but hopefully they will like the effect. The Extreme Glitter was added to the horn and the light sections of the mane.
 A simple finish to the inside of the card to make up for the Extreme Glitter.
 And the final touch, some brown ribbon and a name tag.

Ingredients:-
  • Image - Unicorn Dreams by Karen Middleton
  • Colouring Medium - Promarkers
  • Dies - X-Cut Labels
  • From my Stash - velvet, hessian (burlap), ribbon, Extreme Glitter
I am entering into the following challenges:-
Thank you for stopping by today and hope you have a happy crafting time ahead of you :) xx

Sunday, June 7, 2015

Nectar of Life

Sweet Pea Stamps

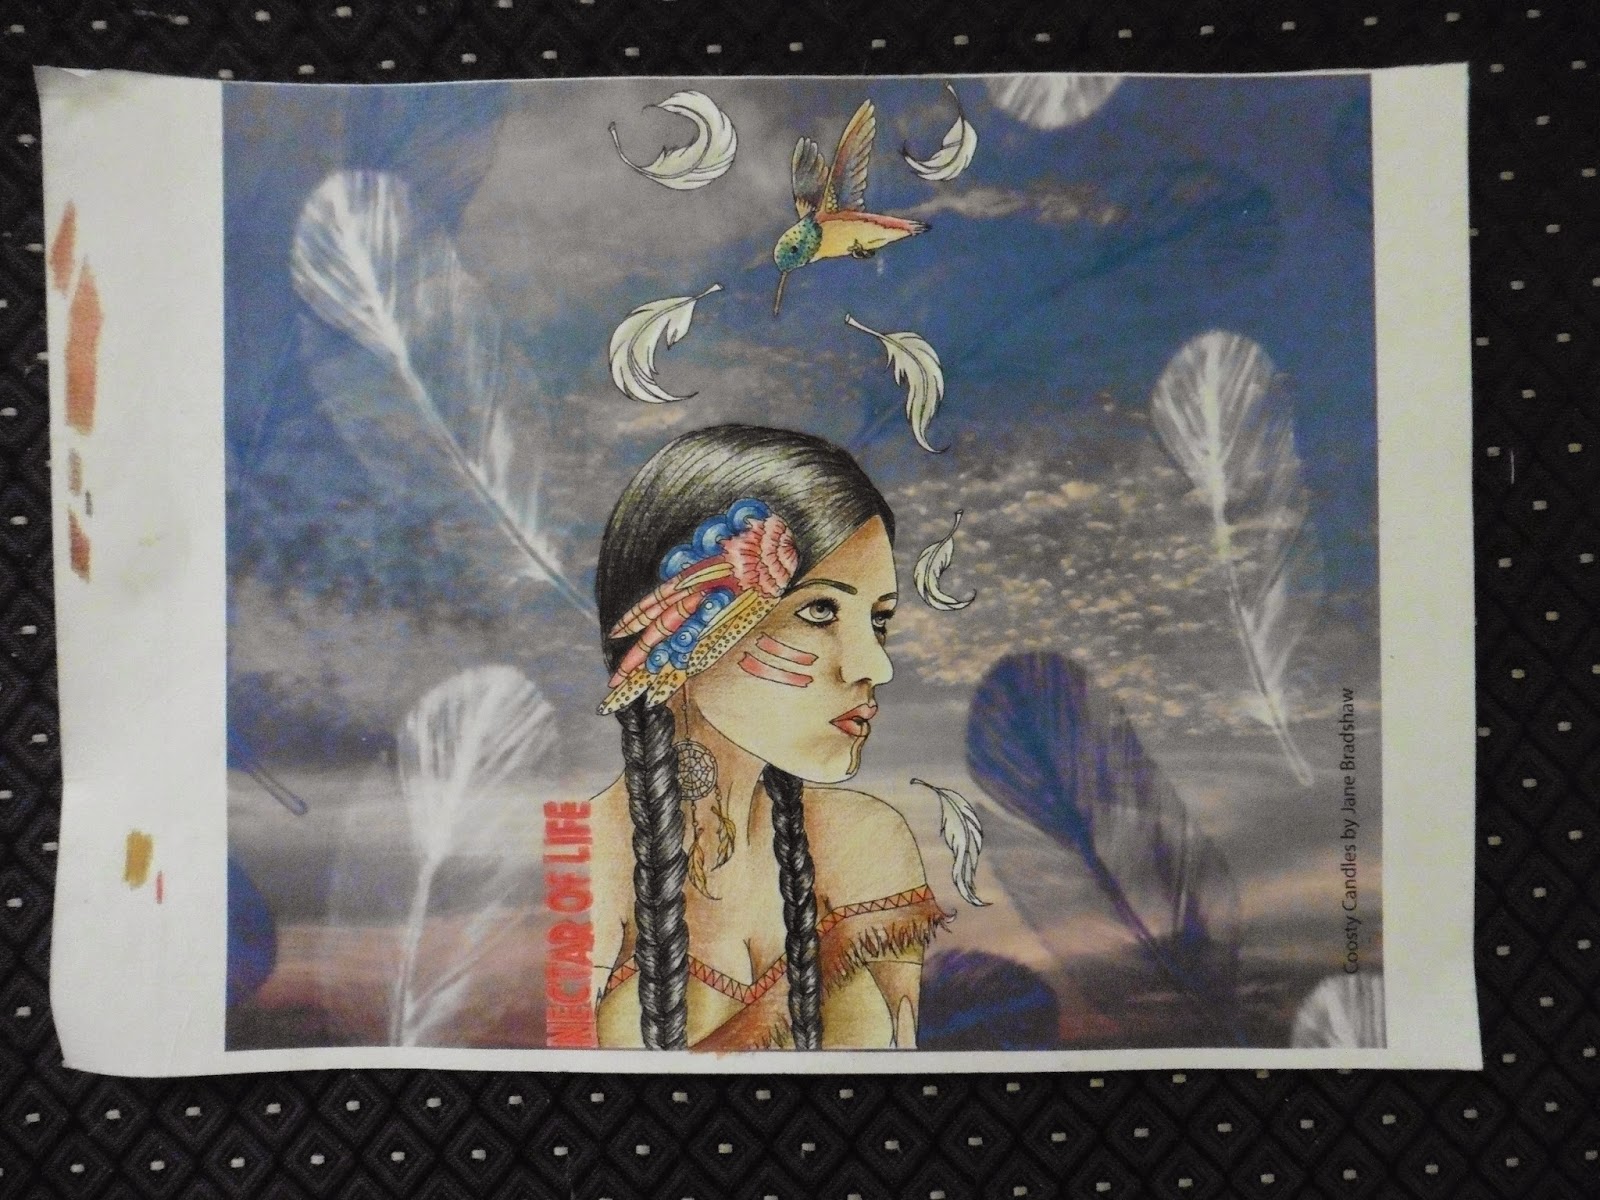
Today is my day to showcase and image from Sweet Pea Stamps and I have chosen to work with the beautiful image Nectar of Life  by Charmaine Flannery which is available from the Sweet Pea Store in both rubber and digi.  I so love decorating my candles and what a great feeling when just the right image is found :) :) I have a passion for Native American themed images so you can imagine I was in my element with this creation.

To begin with I printed my candle wrapper on tissue paper.  The image in the background is a photo and I added some feathers using a Photoshop brush by Obsidian Dawn.  Next I added the digi image and added the name of the digi to the left hand side.
The image was coloured with Faber Castell Polychromos coloured pencils.
I have a few wax strips which are for candles and I often use to finish off the top of the candle but today I am trying something new.  Using some wax sheet I bought ages ago and so far have not been able to work out what to do with them lol, I have tired using a small cutter today which I have for Silver Metal Clay work.  Worked pretty well and I cut loads of these wee ovals and used them to decorate the top of the candle to hide where the wrapper end.
Still feeling like experimenting I have used and embossing folder to make a light impression on the gold wax discs.  I did try pressing harder but then the discs clung to the embossing folder so that was not working.  Have to think of something else I can try in the future.
To finish off the candle I added some gold candle bronzing powder and some gold trim on the bottom edge.  Last job was to varnish the candle with candle varnish, a water based varnish especially for candles and fire safe. All parts, with the exception of the bottom trim are fire safe, I don't mind using something not so fire friendly at the base of the candle as this is a long way from the naked flame and I am sure the candle would be thrown away long before it burns to the area of the trim.  If you would like to see how I do my candles I have a wee video you can watch.  Candle Wrapper Video

Ingredients:-
  • Image - Nectar of Life  by Charmaine Flannery
  • Colouring Medium - Faber Castell Polychromos
  • Dies - I used a small cutter designed for Silver Metal Clay
  • From my Stash - Candle, candle varnish, candle gold bronzing powder, gold trim
I am entering into the following challenges:-
Thank you for stopping by today and hope you have a happy crafting time ahead of you :) xx

Monday, May 18, 2015

Aphrodites


Today is my day to showcase and image from Sweet Pea Stamps and I have chosen to work with the beautiful image Aphrodites by Gabriella Szabo which is available from the Sweet Pea Store in both rubber and digi.

This week I have decided on another candle, this image just shouted at me that it was the right proportions :)

To begin created the background and then placed the image without the white background.  This was then printed on tissue paper and coloured with Faber Castell Polychromos pencils.

 Once coloured I then mixed some Pearl Ex powders with very watery PVA glue and painted this on the wings and the light spots.  I had a wee bit left over so also added some to the petals on the roses.  If you would like to see how I decorate my candles I have a tutorial - click here to view.

Here you can see the two side views of the candles.
 Front view of candle

Ingredients:-
  • Image - Aphrodites by Gabriella Szabo
  • Colouring Medium - Faber Castell Polychromos pencils
  • From my Stash - Candle varnish, Pearl Ex, gold wax strip, tissue paper
I am entering into the following challenges:-

Thank you for stopping by today and hope you have a happy crafting time ahead of you :) xx


Monday, May 4, 2015

SPS - Margaret Fae

Sweet Pea Stamps

Today is my day to showcase and image from Sweet Pea Stamps and I have chosen to work with the beautiful image Margaret Fae by Amanda S Byron which is available from the Sweet Pea Store as a rubber stamp.  I have to admit this is not the sort of image I colour but oh what fun I had :) :) :)

To begin with I coloured the image with Faber Castell Polychromos colouring pencils.
 Next it was onto the card, this week I am making an easel card.  My first job was to find a suitable paper to work with.  I don't buy much in the way of design papers preferring wrapping paper and sheet of hand made paper.  I also have a few sheets of the paper often used to wrap flowers in from the florist and it was in that bundle I found just what I was looking for,  As the paper is very thin I then adhered it to some white card stock.
The sections for my card were cut with Spellbinders Grand Scalloped Circles and Grand Circles.
Keeping to the colour pallet of this card I die cut some butterflies from Spellbinders Les Papillions 2 and I chalked them to match my colouring on the digi wings.
 The sentiment was die cut using Tattered Lace Antique Ovals and I added a pink peel off birthday sticker.  Again the sections were coloured with the same chalks as the butterflies.  Liquid pearls were added to finish off.
 Two of the butterflies were used for the card front and the third I attached to my fussy cut image with a piece of wire so it would appear to be flying in the air.  The image and the butterfly were then attached to the card inside in  way that they can fold flat when the card is closed and then stand up at the front of the card when opened up giving a really wonderful 3D effect.
Using Spellbinders Foliage I cut a couple of leaves out of the scraps I had left over from the circle leaf paper covered sections.  Some green natural fibre mesh, a chipboard bird, bow and pearl spray finished off the front of the card.
 And here is the card opened up


Ingredients:-
  • Image -  Margaret Fae by Amanda S Byron 
  • Colouring Medium - Faber Castell Polychromos colouring pencils
  • Dies - Spellbinders Grand Scalloped Circles and Grand Circles, Les Papillions 2 and Foliage I; Tattered Lace Antique Ovals
  • From my Stash - Liquid Pearls, pearl sprays, ribbon, chalks, green mesh, wire
I am entering into the following challenges:-
Thank you for stopping by today and hope you have a happy crafting time ahead of you :) xx

Sunday, April 26, 2015

Hope

Sweet Pea Stamps

Today is my day to showcase and image from Sweet Pea Stamps and I have chosen to work with the beautiful image 'Hope' by Rebecca Sinz which is available from the Sweet Pea Store in both rubber and digi.

I have not made any of my candles recently and now seem to be on a bing with them.  I did one a couple of weeks ago, this one today and another one in the pipeline which I am trying to do a video tutorial on - that is a challenge in itself lol.  Anyway, here is todays candle :)

So many folks ask how I do these candles hence the trying to make the video but in the meantime I will do my best to explain the basics.  I start by using temporary adhesive spray on a piece of paper about 220gms in weight and then lay the tissue paper over the top doing my best to avoid any wrinkles.  Next I trim the excess tissue paper off so it will run through my printer with no issues.  To prepare my wrappers I use a template I made of the candle sizes I use regularly.  I then browse through my photos to find a suitable background.  For this wrapper I used two images, the sky was a photo I took in the Maldives on my 25th Wedding Anniversay - a fabulous second honeymoon lol, and for the foreground I used a beach scene taken while lying on my belly to get the rocky outcrop.  Next, in Photoshop, I imported the two images and removed the sections I did not want, here it was all the see and sky from the beach photo so I was only left with the rocky outcrop which I thought would be perfect to place the digi on.  Next I removed all the background from the digi so I was left with the equivalent of a .png image which I could then hand colour in line with the Terms of Use of most of the image we use these days.

I use crayons to colour my candle wrapper images as I find they work the best, this one was coloured with Faber Castelly Polychromos
And here is the image fully coloured.
Next I tried something new and tried rubber stamping a gold border, sentiment and a floral design to represent stars.  The sentiment worked fine and the flower stars were not to bad but the border was a disaster.
When working with candles it is imperative to think of fire safety, I would so hate to be the cause of a fire in somebody's home from one of my candles, so I have a couple of produces which are totally safe for decorating.  One is a gold dust and the other is a water based varnish.  To cover up the rubbish gold border I used the gold dust and tried to get a a vibrant distressed look.  This was applied with a soft sponge for the top and then I used a wide paintbrush to sweep around the upper section of the wrapper. To balance the gold out I added some more to the rocky outcrop at the bottom of the candle. Finally a quick layer of the candle water based varnish to add a shine and all done :)


Ingredients:-
  • Image - 'Hope' by Rebecca Sinz
  • Colouring Medium - Faber Castelly Polychromos
  • From my Stash - gold dust, candle varnish and the candle.
I am entering into the following challenges:-

Thank you for stopping by today and hope you have a happy crafting time ahead of you :) xx

Monday, March 23, 2015

SPS - Poppy Sprite

Sweet Pea Stamps

Today is my day to showcase and image from Sweet Pea Stamps and this week is Artist Week where the whole team are working with the wonderful images by Mitzi Sato-Wiuff.   I have chosen to work with the beautiful image Poppy Sprite  by which is available from the Sweet Pea Store as a rubber stamp.

I started by colouring the image with Promarkers, I do find red such a hard colour to work with but have to admit, I had great fun with this image :)
Next I moved onto my mount.  You know when you find some fabulous paper, buy it and then never use it, well today I decided it was time to cut into a a gorgeous paper I bought about 5 years ago and just have not had the heart to use until now. It has such a beautiful red flocking on it and oooooo so tactile.  Those who know me also know I love tactile card lol.  On the opposite diagonal I backed my card with some ruby red paper and then added red lace on top.  To cover the join of the two areas I added some ribbon.
What other embellishment could be used with the gorgeous Poppy Sprite but poppies.  I don't have a poppy die and although I did design some I ended up using the Pansy die from Sizzix and the stemmed centre is from a Marianne Craftables die. The centre of each petal was air-brushed with a Crimson Promarker.
 I needed a bit more black on the card to link up to the the Poppy Sprite underskirt so used another Marianne Design die - branch.  I then used ultra fine black glitter to on the tops of three black brads for the centres of the flowers.  Sorry they are not in the picture, they were to one side drying lol.
To assemble the card I embossed and cut a couple of circles which I mounted the fussy cut digi on.  A small type black peel off birthday sentiment was then place on the red circle.  A doily was then placed behind this grouping and attached to the card.  The finished poppies and leafy branch were then place on the mount and the mount attached to the card.  For the inside, a couple of basic squares using the red paper left over from the poppies and some of the base colour card and a black branch just to bring it all together.


Ingredients:-
  • Image - Poppy Sprite by Mitzi Sato-Wiuff
  • Colouring Medium - Promarkers
  • Dies - Spellbinders Circles and Squares, Sizzix Pansy and Marianne Craftables Branch
  • From my Stash - flock paper, lace, brads, ultra fine glitter, ribbon, doily and peel off Birthday sticker.
I am entering into the following challenges:-
Thank you for stopping by today and hope you have a happy crafting time ahead of you :) xx

Monday, February 9, 2015

Bleeding Hearts Sprite

Sweet Pea Stamps

Today is my day to showcase and image from Sweet Pea Stamps and I have chosen to work with the beautiful image Bleeding Hearts Sprite by Mitzi Sato-Wiuff which is available from the Sweet Pea Store in rubber
I don't mind making Christmas card, I hate Halloween and Easter cards but oooooo I so love Valentine cards so this week, saying as it is February, the month of love I could not resist.  To begin with I cut the sections of my card on my die cutter.
 Next I covered the back of the folded sections with pink and silver mesh.
 The image was coloured with Promarkers
Next I took some narrow lace and stitched on side with running stitch so I could gather it up.  Using some bought satin roses I coloured them with my pink Promarker, the same as one of the colours as used in the image.
Using an 'I Love You' Sizzix die cut I created the text. With another Sizzix die I made the heart.  As I wanted lots of height here I used pearls to create the spacing between the text and the heart and again on the back of the heart where it will be attached to the card.
 Here you can see the front of the card.  A white lace bow was added to the heart/text die cut, a swirly die cut and three of the five flowers I made to complete the embellishment.
 Close up of the text and heart, you can really see the height achieved here by using the pearls.
 Middle heart of the card has one swirl die cut, a metal silver double heart and another of the flowers in the centre.
The final section of the card has the digi.  I added more lace behind the digi, the same lace I used for the flowers so it would match. Chalk was used to colour the white space around the image.  I then used the final flower to hold the card sections in place when opened.
 And here we have the finished card.


Ingredients:-
  • Image - Bleeding Hearts Sprite by Mitzi Sato-Wiuff
  • Colouring Medium - Promarkers
  • Dies - Sizzix Heart and I Love You, Cherry Lyn b127-Tropical-Flourish, card cut by Rae Carr
  • Flowers, lace, pearls etc from my stash
I am entering into the following challenges:-
Thank you for stopping by today and hope you have a happy crafting time ahead of you :) xx