Followers

Showing posts with label Artist Week. Show all posts

Monday, December 21, 2015

Fruity Babies Watermelon

 Hope you have had a great Christmas folks and are not too worn out after all the festivities :)  Today for my DT creation I am using Janice Cullen's Fruity Babies Watermelon available from Sweet Pea Stamps in rubber.

To begin with I rummaged through my stash of free papers from magazines which I seem to have to make a real effort to use as I always forget about them hahaha. I embossed my chosen paper with a butterfly folder and then mounted this on pink card to match the watermelon on the digi.  The digi, by the way, was coloured with a mixture of Promarkers and Polychromos.  Next I cut a die using Sizzix Frames Ornate Moroccan and added some green butterfly gems and lighter green flower gems.

The inside of the card was finished off with the remaining scraps of my design paper with a pink card Spellbinder lattice on top.  Nice an simple :)

Ingredients :-
  • Digi - Janice Cullen's Fruity Babies Watermelon
  • Colouring medium - Promarkers and Polychromos
  • Dies - Sizzix Frames Ornate Moroccan and Spellbinder Lattice
  • From my stash - Gems, dp from a magazine
Challenges entered :-


Monday, October 19, 2015

Light Yellow


This week is Artist Week and the whole team are using images by the fabulous Karen Middleton.  Karen's images are so beautifully drawn and a dream to colour :) :) :) For my creation I am using the image Light Yellow which is available from Sweet Pea Stamps in both rubber and as a digi.

For my card I first coloured the image with Promarkers and Polychromos.

To make the card I covered some white cardstock with an olive green paper which has a gold fleck which I had embossed.  Next I added a a purple die cut using Spellbinders Victorian Medllion 3 and also used the small medallion of this die set for the yellow accent.  The purple mount and image which I had triple mounted were then attached to the card with foam taps so I had lots of height.
Next I created a bouquet of flowers from my stash, used some very fine organza ribbon for the bow which was finished off with a gold heart then added a die cut sentiment from Creative Expressions and finally a purple metallic butterfly.

Ingredients:-
  • Image - Light Yellow by Karen Middleton
  • Colouring Medium - Promarkers and Polychromos
  • Dies - Spellbinders Victorian Medllion 3 and Creative Expressions Just a Note
  • From my stash - flowers, ribbon, gold heart, butterfly, pearls
Challenges entered:-


Monday, July 20, 2015

Gothic Cuties' Dragon Fairy


Another very quick post from me :) :) I am in the UK at the moment so many miles away from my craft room with all my goodies although I do have some fun new bits and pieces to play with :) :) :) 

The image I have used is Gothic Cuties' Dragon Fairy by Ronne P Barton available from Sweet Pea Stamps in rubber or as a digi.  I coloured the image with Faber Castell Polychromos  While I have been in the UK I have been getting a few more dies and one of them I have used on this card; it is a Tattered Lace corner die which I used four times to make a frame.  The card base was embossed with an embossing folder but I have no idea where I got it from grrrrrr.  Next I fussy cut my image and mounted it with foam tape then completed the inside of the card to match the front (amazing how a change in light can make so much difference to colour, the inside of the card is identical colour wise to the front :) :) )


Ingredients:-
I am entering into the following challenges:-


Sunday, June 21, 2015

Silver Flute


The image was printed onto some background paper I designed, simple but with a great texture pattern and just enough not to distract from the beautiful image.  The inside of the card was designed using the same digital paper with a simple addition of a black bar.  Next I coloured the image with Spectrum Noir markers and then finished off with Faber Castell Polychromos pencils.  For the background of the image I used my new Spectrum Noir inks, just one problem, the paint brushes that come in the sets are all much bigger than I usually work with and I don't have my fine paintbrushes with me at the moment, think I will have to go and buy a couple :) :)  Once the colouring was completed I then mounted both sections onto black card. To finish off the front of the card I used a new die I have just got and made my black paper bow and edging.  I can see this die is going to be one of my favourites as I am totally useless at tying bows lol.

 inside of card


To begin with I coloured the image with Promarkers   Faber Castell Polychromos

Ingredients:-
  • Image - GABRIELLA SZABO - The Silver Flute available as a digi
  • Colouring Medium - Spectrum Noir markers and inks, Faber Castell Polychromos pencils
  • Dies - Filigree Bow
  • Digital Design paper - by me
I am entering into the following challenges:-


Monday, April 20, 2015

SPS - Ancient One

Sweet Pea Stamps

Today is my day to showcase and image from Sweet Pea Stamps and I have chosen to work with the beautiful image Ancient One by Joanne Schempp which is available from the Sweet Pea Store in both rubber and digi.
I have not tried mixed media like this before so be gentle with me :) :) I am in awe of some of the mixed media projects I have seen on the web and just could not resist giving it a go.  To begin with I printed my image, well two as I was thinking about having another Joanne Schempp image of the sail ship in the background but had not totally made up my mind.  The idea soon flew out the window and I decided I did not need it.
 Next I raked out a whole load of dies and double cut them using stiff white card.  The dies I used were Tattered Lace Retro Alphabet, Memory Box Splash Border which I cut up into two sections and also used the spiral excess bits of the die and finally Marianne Designs Creatables Anchor.  I also added some Flower Soft and some bead and metal shells.
 I don't have many supplies for this sort of project as not much is available in Saudi Arabia, or a least I have not seen many products around but I do have some white acrylic paint so that is what I used to paint over the background ready for airbrushing with Promarkers later.  Next I coloured the image with just one colour of blue Promarker, trying to build up the colour but using several layers.
 Onto the background, I first masked my coloured image and set to with the airbrushing in two colours of blue, one was Bluebell but I can't remember what the other was lol - afraid I was having to much fun to remember to write down what I had used.
 Next I stippled some PVA glue in areas and then stippled with silver bronzing powder on top. I added lots of Pearl and Silver Liquid Pearls to the digi.
Not quite happy with the digi so using the darker of the two blues I used for the background I added a bit more depth to him.  Finally I added a silver ships wheel charm and three brads. A blast of Crafters Companion Silver Varnish and all done.  This decorated mat was then mounted on a silver mirror card mat, a navy corrugated mat and then a mauve mat. The group was them attached to my navy card blank.
For the inside of the card I used Spellbinders Labels 1 and a Spellbinder embossing folder.  A bit more of the silver bronzing powder and another anchor completed this section.
 And here we have it - a rather funky man card.  For a first attempt I am pretty pleased with myself and most of all I had amazing fun, getting covered in paint and glue I felt like a kid all over again, such a fun day :) :) :)

Ingredients:-
  • Image - Ancient One by Joanne Schempp
  • Colouring Medium - Promarkes, acrylic paint
  • Dies - Tattered Lace Retro Alphabet, Memory Box Splash Border, Marianne Designs Creatables Anchor and Spellbinders Labels 1
  • Embossing Folder - Spellbinders Seashells
  • From my Stash - Silver Bronzing Powder, Liquid Pearls, shells, metal shells, ship wheel charm and brads
I am entering into the following challenges:-


Thank you for stopping by today and hope you have a happy crafting time ahead of you :) xx

Monday, March 23, 2015

SPS - Poppy Sprite

Sweet Pea Stamps

Today is my day to showcase and image from Sweet Pea Stamps and this week is Artist Week where the whole team are working with the wonderful images by Mitzi Sato-Wiuff.   I have chosen to work with the beautiful image Poppy Sprite  by which is available from the Sweet Pea Store as a rubber stamp.

I started by colouring the image with Promarkers, I do find red such a hard colour to work with but have to admit, I had great fun with this image :)
Next I moved onto my mount.  You know when you find some fabulous paper, buy it and then never use it, well today I decided it was time to cut into a a gorgeous paper I bought about 5 years ago and just have not had the heart to use until now. It has such a beautiful red flocking on it and oooooo so tactile.  Those who know me also know I love tactile card lol.  On the opposite diagonal I backed my card with some ruby red paper and then added red lace on top.  To cover the join of the two areas I added some ribbon.
What other embellishment could be used with the gorgeous Poppy Sprite but poppies.  I don't have a poppy die and although I did design some I ended up using the Pansy die from Sizzix and the stemmed centre is from a Marianne Craftables die. The centre of each petal was air-brushed with a Crimson Promarker.
 I needed a bit more black on the card to link up to the the Poppy Sprite underskirt so used another Marianne Design die - branch.  I then used ultra fine black glitter to on the tops of three black brads for the centres of the flowers.  Sorry they are not in the picture, they were to one side drying lol.
To assemble the card I embossed and cut a couple of circles which I mounted the fussy cut digi on.  A small type black peel off birthday sentiment was then place on the red circle.  A doily was then placed behind this grouping and attached to the card.  The finished poppies and leafy branch were then place on the mount and the mount attached to the card.  For the inside, a couple of basic squares using the red paper left over from the poppies and some of the base colour card and a black branch just to bring it all together.


Ingredients:-
  • Image - Poppy Sprite by Mitzi Sato-Wiuff
  • Colouring Medium - Promarkers
  • Dies - Spellbinders Circles and Squares, Sizzix Pansy and Marianne Craftables Branch
  • From my Stash - flock paper, lace, brads, ultra fine glitter, ribbon, doily and peel off Birthday sticker.
I am entering into the following challenges:-
Thank you for stopping by today and hope you have a happy crafting time ahead of you :) xx

Sunday, January 25, 2015

SPS - Swinging in the Stars

Sweet Pea Stamps

Today is my day to showcase an image from Sweet Pea Stamps for our Artist Week where the whole DT use images for the same artist which this week is MAIGAN LYNN and I am using the image 'Swinging in the Stars'  available from the Sweet Pea Store.  This image is available in both rubber and as a digi.

For this creation I have made a box to hold 'Post It' notes, a small pad of paper and a pencil.

To begin with I printed the image twice, one image to work with and the other in case I mess up (which I did hahahaha).  Hubby bought me some new crayons the other day - Derwent Artist, so I decided to do my colouring sitting in my chair while watching TV instead of in my craft area.  Now that, I have to admit, I really enjoyed.  However, the following morning I was not very happy with my colouring, the image looked very flat.  The crayons are lovely to use, wax based, but I am finding it very hard to build up the contrast even when working lightly to build up the colour.  To try and rectify this I added some Promarker colour (bad idea as it was impossible to blend) and also painted the background with some turquoise glitter paint over the background I had coloured the night before (another bad idea as I ended up painting over parts of the digi).  Right, how to sort this - colour the second digi and fussy cut to put on top hahahahaha.  Again I used the Derwent Artist crayons and with better light and adding black was able to build up the dark areas a bit better.  Still not happy though.

I should add that before I printed the image I added a poem to the moon, this is not part of the original digi.

 Next to prep the card to make the box and outside cover.
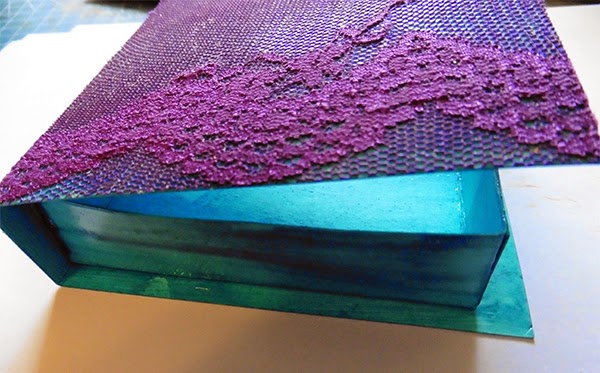
 I painted the box and cover with the same blue glitter paint I used on the digi background and then added some purple lace to the top of the box.
On the front of the box I added a couple of metal decorative bit I picked up in a local shop sale basket.
 Onto the pencil.  Using my lovely free IKEA mini pencils I painted it with gold paint.  I then drilled a hole through the top of the pencil and added a beaded chain made up of beads to match the box and digi. I then threaded the wire through the hole, added another bead and passed the wire back through the hole. To finish off I twisted the wire round the pencil to hold it tight.  This is my newest way of attaching my bead chains to the pencils and certainly the most successful so far.
 Here we have the completed box.
 And this is the top view.  The digi is mounted on gold glitter foam and the die is cut from the same material, really funky stuff.  Think I picked this up in the Range amongst the kids craft stuff and it was so cheap, just goes to show you don't need to buy all the expensive goodies out there to work with <g>.  The die used is Joanna Sheen - Large Filigree Fan


Ingredients:-
  • Image -  'Swinging in the Stars' by Maigan Lynn available from the Sweet Pea Store.
  • Colouring media - Derwant Artist crayons and turquoise glitter paint 
  • Die - Joanna Sheen - Large Filigree Fan
  • Lace, stars, foam sheet etc. from my stash
I am entering into the following challenges:-
Thank you for stopping by today and hope you have a happy crafting time ahead of you :) xx

Monday, December 22, 2014

SPS - Lillith

Sweet Pea Stamps

Today is my day to showcase an image from Sweet Pea Stamps for our Artist Week where the whole DT use images for the same artist which this week is Teresa Sherman.  I have chosen to work with the beautiful image Lillith which is available from the Sweet Pea Store.

I had originally printed this image on a printable mirror paper but when I started colouring it in I really as not happy with the result. Time to try again this afternoon <g>.  Now last night I had a bad night and got all wound up after watching the Science Channel for far to long.  The final straw was a program on how robots are infiltrating our lives so much and the rolls they are expected to fill by, I think it was, 2029 - now that is only 15 years away!!!!!  They estimate the cost of a personal robot in the home will fall in cost to make them readily available to the mass population.  Hey no problem in that but they will also be so prominent in the workforce.  Fine for the 'educated' behind a desk I guess but what about the manual labor force - the first that will more than likely be replaced.  WOW lots of free time to enjoy oneself I hear you say but where does the money come from if you don't have a job because you have been replaced by a robot.  All I could think of was the crime rate would shoot up as idle hands are the devils work!!!!!  OK, I stop now hahahahaha, I could go on but won't.  Needless to say I was not in the best of moods when I got up this morning but still had to do this card.

I then thought I would try something new, instead of colouring the image as usual I placed a gradient overlay over the image before printing.

Next I only used a black oil pastel pencil to colour the hair and add some shading to the face.  Rather interesting and I did have fun.  Those robots were not bugging me now hahahahaha
The background of the card was to be all black - OK maybe I am still thinking about those darned robots :).  Using a gray card base I then ruffled black lace on it.

Time to cut the digi - but I could not find a die I liked so in the end I decided to use a leaf die and create a sort of free flowing frame.  Once I had glued the dies into position I then removed the excess part of the digi.
 More black, this time flowers which were white but I airbrushed with black.
 Using a remnant of the black lace from the background I created a flower and a recycled bit of chocolate box decoration (the glass flower) was glued to the centre.
 Quick and easy for the inside, using a pre cut heart die to create the writing area.
 And here we have the finished card :) :) :)

Ingredients
  • Image -  Lillith by Teresa Sherman available from the Sweet Pea Store.
  • Black Promarker and black  Faber Castle Polychromos 
  • Dies - Crafts Too Leaf Flourish
  • Lace, glass gem etc. from my stash
I am entering this card into the following challenges:-
Thank you for stopping by today and hope you have a happy crafting time ahead of you :) xx

Sunday, November 23, 2014

SPS - Zoe

Sweet Pea Stamps

Today is my day to showcase an image from Sweet Pea Stamps for our Featured Artist Week where the whole team are using images from Regan Kubecek.  I have chosen to work with the image Regan Kubecek's Zoe and make a bag for a change.  This image shouted pink and black to me <g>


To begin with I covered a white gift back with some rather scrumptious black snake skin paper.
 Next I coloured the digi with Promarkers
 Promarkers used
 Back to the bag.  I attached some stunning pink and gold trim around the top of the bag.

Next I mounted the digi and cut some hearts using Cherry Lyn's Heart to Heart Doily
To finish off I made a tag using the same heart die and added a sentiment.  Black beads and a gold heart charm were added to the bottom of the heart tag.  Onto the dreaded task of bow tying, something I am far from good at.

And here we are, the finished bag.  My lights are being being a pain and I can't get them right today so I apologies for the red trim which should be pink and the washed out text on the tag grrrrrrrrr.


Ingredients
  • Image -  Regan Kubecek's Zoe
  • Promarkers
  • Dies - Cherry Lyn's Heart to Heart Doily
  • Covering paper, charm, beads, braid and ribbon from my stash
Challenges entered