Followers

Tuesday, June 30, 2020

Save Water

Just a quick post so I could join in with the Sisterhood of Snarky Stampers this fortnight with the fun theme of water.  Yesterday a wee vid popped up on my FB page showing someone colouring a plastic bag with water based felt pens and then spraying with water before placing their paper on to transfer the colour.  That was right up my street for something fun today this morning and worked well with the water theme.  Love it when things fall into place like that.  So this morning it was out with the felt pens and grabbed a plastic bag to give it a go.  Now my felt pens are ancient and not much ink left in them so not very successful but then I gave it a go with Brusho pigments, awesome although a little stronger in colour than I wanted.  Thought I would try again and splash some washing up liquid onto the plastic bag after I had added the pigment powders and sprayed.  Not sure if it really made a difference or was just a lucky impression but the outcome is what I was looking for.  Should say before I placed my paper on the prepared plastic I did print out the text and couple image.


Once the papers were dry I embossed the one I used for the card base and added some Stickles just brushed on with a paint brush for a bit of sparkle.  On top layer (the one I used washing up liquid to make) I then went over the couple hugging with a silver pen as I did not like the grey printed ink.  To finish off a few gems and that was it.

I am entering this card in the following challenges :-

Thursday, June 25, 2020

Oh Rabbits

Couldn't resist using this adorable rabbit, so much fun to colour. The image is called Cuddly Critters Rabbit from Dr. Digi House of Stamps. The sentiment is a bit of fun for me, my Mum never used bad language but we often as kids, heard her say 'Oh Rabbits' or 'Oh Raspberries' if things were not going to plan. Image coloured with Copics and background stencilled with Distress Inks.


I am entering this card in the following challenges : -

Wednesday, June 24, 2020

Caliope's Cupcake


The challenge this fortnight at I ❤️Promarkers is
 'Must have an Embellishment'

The sponsor for this challenge is Digi Doodle Studio with a prize of  $15 Gift Certificate 


-

For this card I decided to try and use up some of the design paper I have accumulated over the years lol, the pink used here was from a free sheet given with a magazine but I have no idea which one now.   It was the perfect pink for what I wanted so I was a real happy chappy finding it and even happier using it.  The sentiment was printed onto the dp before I started cutting it up of the card.  The image was coloured with Promarkes and in keeping with the challenge theme I set to with lots of embellishments - gems, Stickles, ribbon, button and a couple of metal stars.  I don't normally make cards like this but I did have a lot of fun and it is always refreshing to detour from the norm I think :) 

I am entering this card in the following challenges : - 

Sunday, June 21, 2020

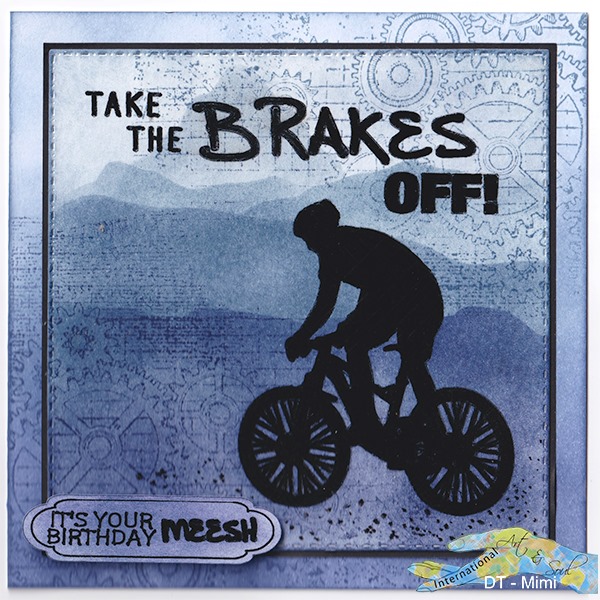
Mountain Biking

 International Art & Soul, a challenge which has been put together to incorporate any type of craft, paper, wood, flowers, recycling, glass - the world is your oyster :).  Come on over an join us with you artwork :)

Challenge #86
Blue as the Main Colour

This fortnights challenge 'Blue as the Main Colour' has been chosen by me.  I love blue, purple too, my favourite colours to wear, to work with, to just be around.  I needed a card for my DIL, she is far from girly, in the army, loves woodwork and mountain biking and she likes blue too lol.  I know during lockdown she has really missed her trips out with my daughter mountain biking so what better theme to use for her B-Day card.


This card looks much simpler that it was to make.  To begin with I found a free image of a mountain biker which I then made some changes too.  The image was then converted to an .svg file and then brought into my software - SCAL.  I then created the text and label for the card also in SCAL. A combination of hot foiling with the WRMK attachment which works in my die cutter and regular cutting for the name tag.  It is a real shame that black foil I used looks so matt in the photo, in real life you have the lovely even texture of the card that you have with stamped images but a sheen of the black so different from just using black ink.  Once the foiling was done I then used Distress Inks for the background, used a gear stamp for a bit of interest and some black dots to represent gravel and help ground the image.  My real challenge here was with the tag - first hot foil emobssing and then getting the die cutter to cut so everything was perfectly lined up, so please it worked so very well (just a matter of great care not to move anything once the foiling was done so alignment was the same when the hot foil attachment was changed for the blade).  Certainly something I will be doing again, especially when I want shaped labels which I don't have a physical die the correct size for.


I am entering this card in the following challenges : -

Wednesday, June 10, 2020

Cone of Shame


The challenge this fortnight at I ❤️Promarkers is
 'For A Boy'
and the sponsor for this challenge is Knitty Kitty Digis with a prize of Prize 3 single images to the winner (or one set).


For my card I have used the image Cone of Shame.  The dp is digitally made and was quite a challenge as I hate wasting ink lol.  That means working out where I can put the white square over the pattern area so nothing is printed in that area, that bit is quite easy but I needed this time to also have the text positioned in the right place so when I cut the paper for the design everything fitted.  Not really complaining, it was a good challenge for my old brain cell ROFL.  The digi image was printed and coloured with Warm Grey Promarkers, Aegean Cyan and Cool Aqua.  I then fussy cut the lower section of the digi to form the wavy line and placed the dp with the printed text on it behind.  An embossed layer was all that was needed to lift the image layer from the dp layer and a little bit of faux stitching on the digi layer to link in with the stitched dies used completed the card. 

I am entering this card in the following challenges : -

Sunday, June 7, 2020

Turtle Lanterns

 International Art & Soul, a challenge which has been put together to incorporate any type of craft, paper, wood, flowers, recycling, glass - the world is your oyster :).  Come on over an join us with you artwork :)

Challenge #85
Under The Sea

This fortnights challenge 'Under the Sea' has been chosen by Chriss.  Oh so many ideas for this challenge and then it seems that something I needed for the guest house by the sea we are doing up was perfect even though it meant a mega simple make from me.  I wanted a couple of night lights in one of the bedrooms and had two small metal tea-light lanterns I had bought.  Although I was not going to decorate them initially I got round to thinking that using some vellum I have had for years and years with an underwater theme would be rather cool.  So, for this challenge, easy though the creation was, just a matter of cutting the vellum to the right size, I do love the outcome :) and so perfect for our holiday guest home which is in a village called 'Seahouses', a few minutes walk from the beach on the Northumbrian Coast. 


I am entering this card in the following challenges : =


Tuesday, June 2, 2020

Bluetit Pyrography Tea-light Holder


Challenge 133
R is for Round or Dots

Welcome back to the IKEsWORLD challenges :)  do pop on over to IKEsWORLD to join in the challenge, it is always so much fun and  Ike produces the most amazing stamps, everything from off the wall to cute and fluffy :) :) :)


I needed a spare gift just in case my DIL had her mother join us at Christmas (yep I made this a wee while ago lol), as it turned out she was not able to be with us all on the 25th as her other daughter wanted her to be with her and her new baby so she visited on the 23rd of Dec which is her birthday and I was able to give her this then when hubby and I went out to my daughters to join them for dinner.  The image used is Bluetit #1 and the designing for this was done on Illustrator so I could create the background and then reverse all the panels ready for transferring the images onto wood.  To do the transfer I just use regular copy paper and a laser printer, cut the sections and attach to the wood on one side.  Next the fun and easy bit, using high strength acetone, a paint brush and a spoon.  Wet small areas of the design with the acetone and then rub with the back of a spoon, the laser ink then transfers to the wood.  Next it was out with the pyrography tools and burn the required areas.  Only a little shading was added to the bird after the outlining was done.  In keeping with the challenge the background design is made up of circles and I added extra dots to the top of the tea-light holder.

Ingredients:-
  • image - BLUETIT #1  by IKEsART
  • colouring medium - None
  • other items - twin tea-light wooden holder, candles, pyrography tools, acetone, spoon
I am entering this project into the following challenges:-
  • Sweet Stampers (M, P10, E3, use stamp or digi) #44 - Animals / Birds