Followers

Sunday, September 7, 2014

OSAAT - Biding Time Candle Card

Hello folks.  We have another challenge at One Stitch At A Time so how about popping over to see all the fabulous creations by the design team.

We have some changes going on with the way we run the challenge, we are now going fortnightly with a prize for the random winner and badge for the Top 3 chosen by the DT.

Challenge #219

Theme 'Anything Goes with a Die' 

The sponsor is StitchyBear Digital Outlet with a 5 image September prize pack. Remember if you use one of the store items you can enter as many times as you want <g>.

This week I worked with the image Biding Time by Barb Jensen and decided to make something I have not made before, a candle gift card.  So much fun and I must thank Eret for her fab template which I download, all set for A4 paper size.


To begin with I printed the image with very faint lines and then coloured her with Promarkers.
Promarkers used
Now, this is a 'die challenge' so along with the die used to mount the digi and the sentiment I also used Cottage Cuts Bella Leafy Branch.


Next I airbrushed the die cut with my Promarkers and cut it into sections.  Two part were used on the main rose bouquet and the small piece on the candle box section.  To finish off the bouquet I used some ready made roses and a tiny pink bow.
Here is the third part of the cut die again with a pink rose.
The front of the candle card
Image showing the inside of the card
The completed project.

So come along and join in the OSAAT Anything Goes with a Die challenge for a chance to win this fab digi pack :)

Ingredients:-
  • Digi -  Biding Time by Barb Jensen  available from the StitchyBear Digital Outlet
  • Dies -  Cottage Cuts Bella Leafy Branch and Sizzix - 657938
  • Promarkers
  • flowers from my stash
I am entering the following challenges
Thanks for looking and hope you have a happy crafting day:)


Tuesday, September 2, 2014

Pocket Watch

Time for another challenge over at

Anything Goes

Welcome back to the IKEsWORLD challenges :)  I think we are all refreshed after our Summer break - wow that went a bit fast, seems like only the other day I was posting my DT creation for IKEsWORLD.    Pop on over to IKEsWORLD to join in the challenge, just remember, you must use and IKEsART image to be eligible for the prize.  Why not pop on over to the store, Ike produces the most amazing stamps, everything from off the wall to cute and fluffy :) :) :)

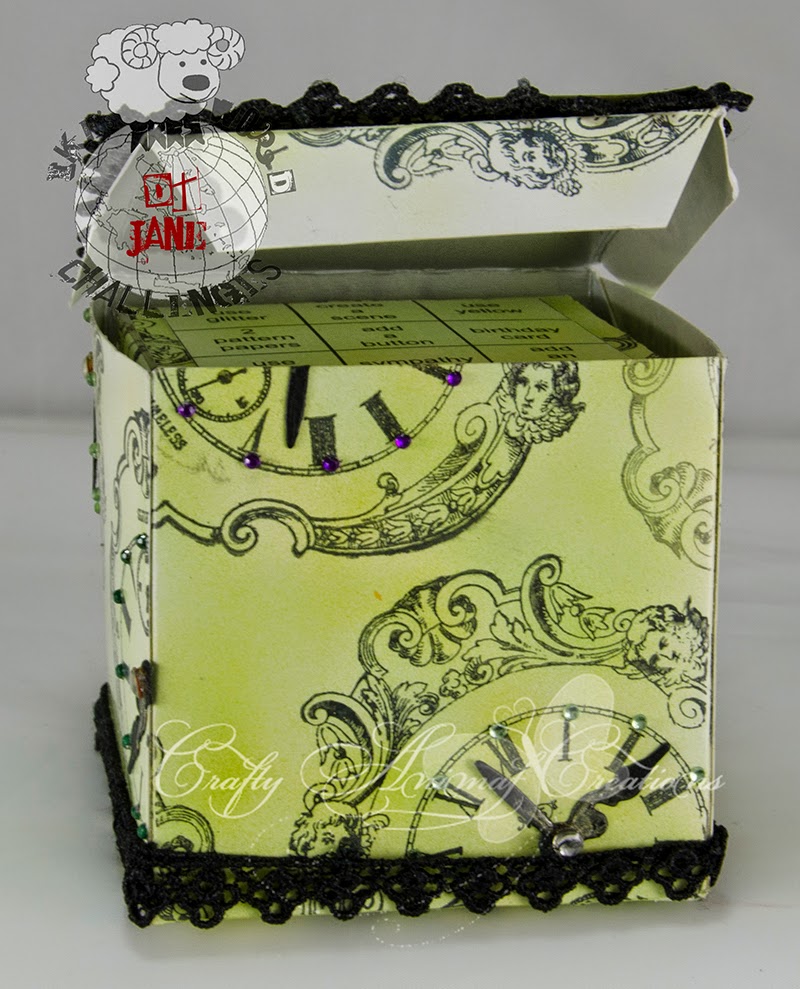
An Anything Goes challenge is certainly a challenge for a silly brain like mine, so many ideas I get throughly confused and flustered.  Now, for some reason, this came together perfectly for me hahahahaha as I have made myself a 'tic tac toe' die which fits snuggle in a box.  The next time my silly brain gets lost in the land of what to do for an Anything Goes challenge I will take out my die, roll it and then use the 'tic tac toe' grid which lands uppermost to get me going.

I do need to apologise here, rather a lot of pictures taken to show you what I did.

To begin with I chose to work with the image 'Pocket Watch' for no other reason than I felt like using it.  Now that is not the best starting point for me in an Anything Goes and I normally end up making a card.  However, out of the blue lightening struck and the Anything Goes die was born.

To begin with I cut a cube template and then airbrushed it with two shades of green Promarkers.  Next I got brave and rubber stamped a fab clock stamp I recently got.

Fingers crossed as I assembled the box - brill, it went together like a dream.
Next job was to print the tic tac toe grids I had made, one for each side of the die and also print the digi.  Everything was airbrushed in the same way as the die.
With the inside box (dice) done I created a second box a little bigger to hold the dice in.  Again it was airbrushed and then rubber stamped.
Time to test - would it all fit - yes it did, a big sigh of relief.
Finally onto colouring the digi, I used gold shades of my Promarkers and a gold pen.  The sentiment around the digi was digitally created by, well I think you can guess hahahaha  To give a gold sheen to the digi topper I sprayed Crafters Companion Gold varnish - my favourite purchase, wish I had bought two tins as I don't this one is going to last me a whole year here in Saudi.
 Promarkers used.
Almost there - time to embelish the outer box.  I used tiny purple, green and light green gems around the hour points on the clock faces then added clock hand dies, part of an X-Cut set.  Some black lace to finish things off and . . . .

here you go - done at last, I just love the vintage look of this box.


Ingredients:-
  • Digi - Pocket Watch by IKEsART
  • Promarkers
  • Gold varnish spray
  • Lace, gems and gold pen from my stash
I am entering this project into the following challenges:-

Sunday, August 31, 2014

SPS - Gears and Glass

Sweet Pea Stamps

Today is my day to showcase an image from Sweet Pea Stamps and I have chosen to work with the image Gears and Glass by Meredith Dillman.  I followed this month challenge theme for this creation of 'The Holiday's are Coming'.  As I keep saying I am not a lover of Christmas and I have to admit I don't like Halloween either, I guess it is because the kids have grown up and at the moment we live in different countries, the kids in the UK and hubby and I are in Saudi Arabia just now.  Anyway, back to my creation, during holiday festivities there are always lots of parties going on so my card is party based :) with the floral background representing leaves and flowers falling for Autumn and the lovely lady all dressed up in her finest attire for Halloween and Christmas parties.  Hope I get away with my off the wall thinking hahahaha.


To begin with I printed and coloured the image with Promarkers.  I then added clear embossing powder to her shoes and holographic embossing powder to her wings and the lights.  Trying something new, I distressed the edges with the Tim Holtz distressing tool - very odd to use but easy peasy.
Promarkers used
There is not much work in the embellishing of this card, just some lace and a border which I added text to before printing.  A couple of corner dies (Tattered Lace) and that was it.  However not an easy card in my book, the image took me about 2 hours to colour, so quick on the card, timely on the colouring :)

Ingredients
  • Image -  Gears and Glass by Meredith Dillman
  • Promarkers
  • Dies - Tattered Lace corners
  • Backing paper - Crafters Companion
  • Lace and buttons from my stash
Challenges entered

Friday, August 29, 2014

Bicycle Made For Two

Well I just can't remember when I last made something that was not for a DT so this morning was a pure joy.
For this birthday card I first embossed some lime green paper with a chevron pattern.
 Next I mounted the embossed paper and some blue card on the green card blank.
Oh I don't like this - the green card blank look as if it had been ironed so flat.  Right how to solve the issue.  Out with a stencil and airbrush with a dark green Promarker - thats better <g>
 A while ago I made some texture paste so, on a piece of mottles brown card I applied some round the edges.  This section will represent 'dirt' on the card later.
While the texture paste was drying it was onto colouring the digi - Just Inklined's Bicycle Made for Two. This image came on a Just Inklined CD I bought last year in their sale, isn't it just brilliant :) :) :)
 Promarkers used.
 Now the textured paste part was dry I airbrushed it with two shades of brown Promarkers.
 Next I rubber stamped trees in greens and blacks and embossed with clear embossing powder.  Some brown gingham ribbon was added and the the 'dirt' layer.
 TO finish off I created a sentiment to around the base of the digi and fussy cut the digi (that was not a good idea - it took ages, but I think it was worth all the effort.

Ingredients

  • Digi - Just Inklined's Bicycle Made for Two
  • Rubber stamp - Scenescapes trees
  • Promarkers
  • Embossilicious embossing folder
  • Clear embossing powder
  • Ribbon and texture paste from my stash
Challenges entered:-

Monday, August 25, 2014

SPS - Pink Peony

Sweet Pea Stamps

Today is my day to showcase an image from Sweet Pea Stamps for our Artist Week where the whole team are using images by Ching Chou-Kuik.  I have chosen to work with the image Pink Peony


I started off by colouring the image with Promarkers.  Once coloured I fuzzy cut the image, not an easy image to fussy cut with the strands of hair but I did not want any white paper on this card.

Promarkers used

I added Liquid Pearls to the fan and parts of the clothing.
Next I covered my card base with some gorgeous paper I bought about 4 years ago (as it is a favourite  I don't use it often <g>).  I recently bought a beautiful die - Joanna Sheen - Large Filigree Fan which I thought would be perfect for this card.  I cut the die 4 times to make the fan shape using the same cream card I used for my card blank.  Two ideas in my head, either cut the corner away as I have shown here or remove the whole section behind the fan.
After some thought I decided on my second thought and removed all the card blank area from behind the fan.
Onto the tag.  For this I used a Just Right stamp which I stamped in green and then used clear embossing powder.  This was cut out using a Spellbinder circle die.  Next I cut some of my beautiful paper in a slightly larger Spellbinder circle die and air brushed it with my Peony Rose Promarker. The final die used for the background is from Sizzix called For The Record 2
Finally I airbrushed some white organza flowers and also a piece of organza ribbon.
 Finally I assembled the card.  Inside view
 Front view.

Ingredients
  • Image -  Pink Peony by Ching Chou-Kuik
  • Promarkers
  • Dies - Joanna Sheen - Large Filigree Fan, Spellbinders Circles and Sizzix - For The Record 2
  • Backing paper - can't remember now sorry
  • Ribbon, flowers and organza ribbon from my stash
Challenges entered


Monday, August 18, 2014

SPS - Imortal Dreams

Sweet Pea Stamps

Today is my day to showcase an image from Sweet Pea Stamps and I have chosen to use the stunning image 'Imortal Dreams' by Charmaine Flannery.


To begin with I removed the white background from the digi making it a transparent.  The image was then placed on some digital paper (Crafter's Companion  - Nov 2012 - Autumn Floral Delight set) and I added a shadow effect.  To finish off I added a text sentiment.   Once printed I then coloured the image with Promarkers.

Promarkers used
 Next I printed the belt from the Autumn Floral Delight set twice.  On on I used eyelets to give the printed image a more realistic look. On the second I only used the buckle, this was then overlaid over the first belt section so the eyelets were behind the buckle.
 Using the blue gingham paper from the set I cut my mount for my image and used the remainder of the printed sheet to make some matching flowers using Spellbinders-Bitty-Blossoms-6.  The centers of the flowers were finished off with a wee brown bead and some stamens which I coloured with my gold Promarker.
 To finish off I added gold peel off stickers to the edges of the mount and image, some metal wings which were attached to a necklace I found in a charity shop and could not stop myself buying hahaha,  and finally some real feathers.

All done :)

Ingredients
  • Image -  'Imortal Dreams' by Charmaine Flannery.  
  • Promarkers
  • Dies - Spellbinders-Bitty-Blossoms-6
  • Backing paper - Crafter's Companion  - Nov 2012 - Autumn Floral Delight set
  • Feathers, wing charms, beads and stamens from my stash
Challenges entered