Followers

Tuesday, February 26, 2013

Anyone getting married?

Oh don't you hate it when the few active brain cells stop working.  Naughty me entered a card in for a challenge and although I read the rules (but obviously did not digest them <g>) which had to have a Mo's Digital Stamp.  You guessed it, my card didn't.

Bless Pat for letting me know and giving me time to put together another card.  Been a busy day at this end so making this card was the perfect excuse to hide in my craft room and get lost in the world of paper, texture and colour :) :) :)  Hope you like the card.


Recipe:-

  • Card template designed on Illustrator and cut using SCAL and my Black Cat
  • Digital image - Bride and Groom Dancing from Mo's Digital Pencil
  • Cream organza ribbon for the bow
  • Flower strands were from Thailand but I can't remember the site I got them from
  • All layers were assembled using foam tape to add dimension to the card

I would like to enter this card in the following challenges"-

Bronte and Bella's Challenge - Mo's Digital Pencil Challenge #173 - Don't be square!

Thanks you for stopping by and hope to see you again soon.

Wow - exciting stuff, I have just found out this card won the challenge over at Bronte and Bella's Challenge - DPT (Mo's Digital Pencil).  Thank you :)

Sunday, February 24, 2013

Hey!!! Mr. Postman

I have had such an amazing couple of weeks with some fabulous news.   I applied to become a Design Team member for the One Stitch At A Time Challenge blog and was given confirmation that I had been selected with two other applicants to join the already existing fabulous team.  It really is exciting seeing how things are done behind the scene <g>.

So what is my first task as a new DT member?  The challenge is:-

Challenge # 152 - Use a Digi

The Sponsor of this Challenge is OSAAT:

With another fantastic prize.... 1 lucky winner will receive a full set of digi images as used by our DT in challenge #150.... So at least a $20 +

Phew, not too difficult, but then a total brain freeze (think we all know what that is like).  Well, I did apply for this new venture to get myself 'out of the box', which is often where I find myself when creating without a purpose.  After a while I see patterns setting in and can't get away from them.  With the 'brain freeze' it is obvious that I was 'out of the box' :).  Anyway, this is what I came up with - hope you like it.  Now over to you, how about popping over the the OSAAT challenge and joining in . . . . . . .


Rercipe:-
  • used an unusual digital stamp for me by Tami (Gingerloft), called 'Butterfly Letter Collage', available from Stitchy Bear Digital Stamps.  
  • mount cut on my Black Cat
  • with all elements created and cut it was time to assemble.  
  • layers  assembled using foam tape and attached a white ribbon through the mount.  This was then stuck to the card with foam tape so I would have a really three dimensional look. 
  • Finally I added SWALK (got to have Sealed With A Loving Kiss) on the back of an envelope, how cheesy is that (or am I just showing my age <g>), a white organza bow and finished off with Stickles on the butterflies and leaves and an orange gem on the bow.
  • For the inside of the card I designed a paper which had the same lace pattern as the front of the card.
That just about sums it up - hope you like the end product :)

I am entering this card in the following challenges:-

Spring is Coming

Morning all, hope you are having a good day.

I was nosing around some of the ongoing challenges yesterday and found Catch the Bug Challenge Blog had one which I really fancied doing.  They had used a photo of tulips and shown the colours from the image which they want used in the card design.  This challenge is right up my street <g>


Recipe:-
  • White card from Craft Creations
  • Digi stamp ' Flower Paper Medley' from Digi Darla Designs'
  • All layers mounted with foam tape.
  • Pale pink organza bow
  • I used Promarkers to colour the edges of the white cards so it would match the colour scheme
  • To complete a few pink gems were added, just for a tiny bit of bling

I would like to enter this card in the following challenges:-

Saturday, February 23, 2013

Fairy Dance

Oh what a lovely morning, in fact a pretty good day <g>.  I bought the digi stamp set Fairy Fun available from StitchyBear some time ago and so this morning I decided to make the card below for my Mum using one of the eight images in the set, she is called 'Spriteflight I.  I know she is going to love this card, all her favourite colours and she has fairies at the bottom of her garden :)


Recipe

  • Card design template from Crafts U Print - kit388548_1415 by Rae Carr
  • Blue, turqoise and white card from Craft Creations
  • I printed the fairy twice, the first time on acetate so I could create the semi transparent wings and the second time on card which I cut the wings off being left with just the fairy, this I put on top of the acetate image.
  • I added hot fix gems to represent the stars, a silver circle for the moon and some glittery flowers just to finish things off.
  • The verse on the card base says ' May you dance with fairies in the moonlight while the stars shine down on you.'

I would like to enter this card into the following challenges

Friday, February 15, 2013

'Rocking' all over the world

I don't normally post my cards here unless it is to enter a competition but I need some practice.  Today, I woke at some crazy hour (think it was 2 a.m.) and not knowing what else to do decided to set to and colour in a digi.  I did manage to do about half of it before falling asleep again.  At a reasonable time to get up and get busy it was rather nice to have a project already started and so the digi was completed and a card designed.  I hope you like it <g>


Recipe

  • Card covered with red mulberry paper
  • Black mount which I designed
  • Digital stamp 'Rocking' from JustInklined which I colored and then printed 2 copies so I could decoupage the guitar on top.  Both these layers were attached to the card with foam tape to give dimension.
  • I cut the treble clef and added a red heart to the centre and finished off with a bow.  Just love this ribbon, had it for ages and never used it (mainly because I can't tie good bows).
On second thoughts I think I will enter this into a few challenges.


Tuesday, February 5, 2013

A cute little teapot box


After so many items on my to do list I decided today to be totally selfish and take time out to create this cute little teapot box, just the right size to pop a few tea-bags into and give to a friend.

Last night I popped on over to the One Stitch at a Time Card Challenge blog - to see what this weeks challenge was in anticipation on spending some 'me time' today.  During the week I had coloured in the digital stamp 'Daisies and Tea' designed by G. Gieb - Digi Blessings available from Stitchybear digital stamps.  One of those really cute stamps <g> that you just fall in love with.

The challenge this week is 'Not Square'.  Feeling a little daring I have decided to move right out of my comfort zone and make a box in the shape of a tea-pot.  After hunting on the Internet for a template to use I found a brilliant one from Miri-d which had a free download.

After a few modifications and preparing the file for my Cougar cutter I cut out the tea pot using blue embossed card and shaded the areas to emphasise the spout, handle and lid using Promarker pens.  The image was then printed, cut and adhered to the front with foam tape (I am rather partial to cards with layered elements).  The text from the digital stamp gave me several headaches, I knew what I wanted to do but not liking fussy cards and not want to add labels etc. I needed to find a way to have white text on the blue card.  Not possible with a printer, I reverted to my tried and tested way of converting the text I wanted to be in white to a vector image, sent it to my cutting software and then cut it out with white vinyl to adhere to the card.  The rest of the text was placed on the digital stamp image.  To finish off, I tied the top of the teapot with some white organza ribbon and added a white daisy to each of the loose ends.

So here we are, the end product which I am rather pleased with and I know just who is getting this as a gift.


It is a bit difficult to see this pretty stamp on the previous photo so here is a close up of the coloured image


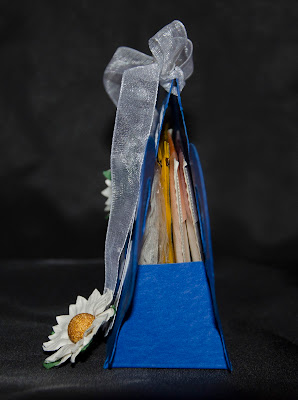
Side view of the teapot box showing how the teabags fit snugly inside


Challenges entered:-
OSAAT - Challenge #149 Not square