Followers

Saturday, January 31, 2015

SPS - First Kiss

Sweet Pea Stamps

Today is my day to showcase and image from Sweet Pea Stamps and I have chosen to work with the beautiful image First Kiss by Conie Fong which is available from the Sweet Pea Store in both rubber and digi.

To begin with I cut my card shapes using a template and white and pale pink card.  The pattern is a download by Ann Smith
 Next I coloured my image with Promarkers
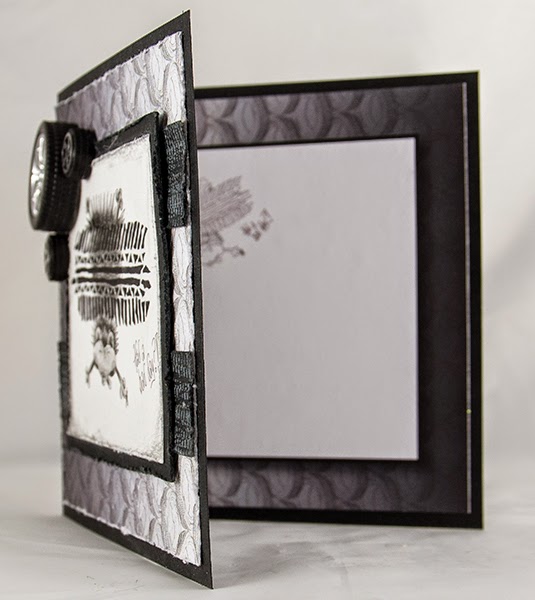
All the sections were folded and glued where appropriate.  I fussy cut the image and placed this on the card.  The small heart from the pattern was used for a simple sticker sentiment and I finished it off with some pale pink colour fragments and some pink hearts which were left over bits from the die cutting.
To finish off I added a pink die cut border along the bottom edge and a double heart behind the digi, some flowers and a big pink bow.
Card closed.
Card open


Ingredients:-
  • Image - First Kiss by Conie Fong
  • Colouring Medium - Promarkers
  • Dies - Card shape by Ann Smith, Sizzix heart border and hearts.
  • Flowers, ribbon and colour fragments from my stash
I am entering into the following challenges:-
Thank you for stopping by today and hope you have a happy crafting time ahead of you :) xx

Wednesday, January 28, 2015

Queen of Hearts

Happy Birthday Lynette


Good morning folks and a very special HAPPY BIRTHDAY to you -  Lynette :) :) :) I hope you have a wonderful day treasure with lots of lovely surprises :) :) Lynette, you are one very special lady and it is a real privilege to be on the DT working with the wonderful images you sell.  I don't think I can ever thank you enough, not only for the opportunities you have send my way, or for the wonderful images I have been able to work with through you but also for your support and friendship which is so very special - THANK YOU :) -  you really are a Queen of Hearts :)

Suzi has put together a blog hope so we are able to send you Birthday Cards on you very special day Lynette and here is mine to you.

Queen of Hears by Rachel Anderson available from Sweet Pea Stamps in rubber and and as a digi.


Normally I do a tutorial of my creations but today I kind of forgot and had a friend round for coffee too while making this lol - she had her first lesson in card making :)  I guess I will just have to write what I did.  The image was coloured with Faber Castell Polychromos pencils and for the background I used a Promarker.  I then cut the image out and mounted on black card.  The card blank is black and wanting to add texture but not colour I opted for black lace medallions on the base layer and on the second matting which also has gold organza ribbon on the lower edge and some more black lace medallions.  The gold Happy Birthday peel off sticker was attached to another piece of card and placed directly behind the top image layer. The image layer was then attached with foam tape to give more height to the card.  To finish off, a simple flower spray using the gold mesh disc recycled from a box of chocolates decoration, one gold lily and a few pearl sprays.

Suzi - thank you so much hunny for organising this, you are a superstar :) xx

Here is the full Blog Hop List so you don't miss any stops, have fun hopping and please leave some love on the Sweet Pea Stamps Blog for Lynette.

Blog Hop List

Ingredients:-
Image - Queen of Hears by Rachel Anderson available from Sweet Pea Stamps in rubber and and as a digi.
Colouring medium - Faber Castell Polychromos, black Promarker and gold pen
From my stash - lace, flowers, birthday peel off and gold organza ribbon

I am entering this in the following challenges:-


Sunday, January 25, 2015

OSAAT - Sisters Friends Forever

Hello folks.  We have another challenge at One Stitch At A Time so how about popping over to see all the fabulous creations by the design team.  The prize this month is an awesome digi pack containing several images and a paper pack too - how cool is that.

Challenge #229

Theme 'Anything Goes with the Colour Purple' 


Well I did really well here, totally forgetting to take any pics as I went along hahahahaha.  Oh well, the fingers will have to do the work now as I tell you what I did.

So much fun with this creation, not only because of all the purple (my favourite colour) but also using the paper.  When I was in the UK my Mum gave me a box of Milk Tray chocolates, now the chocolates were lovely but oooooooo the paper - Cadbury's use the most wonderful colour of purple to wrap their confectionary don't they.  Well, I obviously ate the chocolates but instead of throwing the wrapping away it was put in my suitcase to come back to Saudi ready to craft with.  On this card I used the padded chocolate protection bit to back the card and the thinner paper packaging was glued to card and then embossed with a knitting design.  This card is for my sister who loves to knit and crochet hence the embossing design, the addition of the buttons and the sister charm. The image,  Sisters Friends Forever by Digi Blessings available from the StitchyBear Digital Outlet was coloured with Promarkers.

Ingredients:-
  • Image - Sisters Friends Forever by Digi Blessings
  • Colouring Medium - Promarkers
  • Dies - Spellbinders Grand Squares, Labels 22, Squares and Sizzix - doily
  • Embossilicous embossing folder
  • Lace, buttons, charm, paper bits from my stash
I am entering this card into the following challenges:-
Thanks for looking and hope you have a happy crafting day:)

SPS - Swinging in the Stars

Sweet Pea Stamps

Today is my day to showcase an image from Sweet Pea Stamps for our Artist Week where the whole DT use images for the same artist which this week is MAIGAN LYNN and I am using the image 'Swinging in the Stars'  available from the Sweet Pea Store.  This image is available in both rubber and as a digi.

For this creation I have made a box to hold 'Post It' notes, a small pad of paper and a pencil.

To begin with I printed the image twice, one image to work with and the other in case I mess up (which I did hahahaha).  Hubby bought me some new crayons the other day - Derwent Artist, so I decided to do my colouring sitting in my chair while watching TV instead of in my craft area.  Now that, I have to admit, I really enjoyed.  However, the following morning I was not very happy with my colouring, the image looked very flat.  The crayons are lovely to use, wax based, but I am finding it very hard to build up the contrast even when working lightly to build up the colour.  To try and rectify this I added some Promarker colour (bad idea as it was impossible to blend) and also painted the background with some turquoise glitter paint over the background I had coloured the night before (another bad idea as I ended up painting over parts of the digi).  Right, how to sort this - colour the second digi and fussy cut to put on top hahahahaha.  Again I used the Derwent Artist crayons and with better light and adding black was able to build up the dark areas a bit better.  Still not happy though.

I should add that before I printed the image I added a poem to the moon, this is not part of the original digi.

 Next to prep the card to make the box and outside cover.
 I painted the box and cover with the same blue glitter paint I used on the digi background and then added some purple lace to the top of the box.
On the front of the box I added a couple of metal decorative bit I picked up in a local shop sale basket.
 Onto the pencil.  Using my lovely free IKEA mini pencils I painted it with gold paint.  I then drilled a hole through the top of the pencil and added a beaded chain made up of beads to match the box and digi. I then threaded the wire through the hole, added another bead and passed the wire back through the hole. To finish off I twisted the wire round the pencil to hold it tight.  This is my newest way of attaching my bead chains to the pencils and certainly the most successful so far.
 Here we have the completed box.
 And this is the top view.  The digi is mounted on gold glitter foam and the die is cut from the same material, really funky stuff.  Think I picked this up in the Range amongst the kids craft stuff and it was so cheap, just goes to show you don't need to buy all the expensive goodies out there to work with <g>.  The die used is Joanna Sheen - Large Filigree Fan


Ingredients:-
  • Image -  'Swinging in the Stars' by Maigan Lynn available from the Sweet Pea Store.
  • Colouring media - Derwant Artist crayons and turquoise glitter paint 
  • Die - Joanna Sheen - Large Filigree Fan
  • Lace, stars, foam sheet etc. from my stash
I am entering into the following challenges:-
Thank you for stopping by today and hope you have a happy crafting time ahead of you :) xx

Saturday, January 24, 2015

Sally and the Little Squirrel

Hi Peeps, hope you are having a lovely day :)

Today I have made a Christmas card for the Crafty Hazel Nut Christmas Challenge blog with the theme - Joy To The World as part of Sweet Pea Stamps sponsoring this challenge.

For my creation I have used the image Sally and the Little Squirrel by Conie Fong available in both rubber and as a digital stamp.


To make my card I first designed the cut out text section and cut it with my die cutter.  I then covered it in such a pretty green glitter.  This was put to one side while I worked on the image.


 The image was coloured with Promarkers
With using patterned design paper I wanted to keep the embellishing simple and opted for some snowflakes.  For these I used the Tattered Lace snowflake die.  To finish them off I covered them in the same glitter I used earlier for the text cut out.
To finish the card off I attached the Joy to the World text cut out and then added a large white organza bow which has a snowflake design on it.

Ingredients:-
Image - Sally and the Little Squirrel by Conie Fong
Colouring medium - Promarkers
Dies - text by me and Tattered Lace snowflakes
Design paper by Papermania
Glitter, ribbon etc from my stash

I am entering this card into the following challenges:-

Tuesday, January 20, 2015

Had a Bad Day

Time for another challenge over at

Challenge 30
Sketch


Welcome back to the IKEsWORLD challenges :)  do pop on over to IKEsWORLD to join in the challenge, just remember, you must use and IKEsART image to be eligible for the prize.  Why not pop on over to the store too :), Ike produces the most amazing stamps, everything from off the wall to cute and fluffy :) :) :)

It is absolutly ages since I have followed a sketch so this challenge was great fun to do.  I don't know about you but I seem to have so few card for the men folk and my poor hubby has his grey matter being frazzled at work at the moment that this creation sort of fell into place on its own.  I have used the image 'Had a Bad Day' which just totally cracks me up, I love it, real humour to brighten a rough day and perfect for a man card.


Here is the sketch you need to follow to enter into this challenge :) :) :) 


To begin with I printed some tyre design paper and then embossed it with a chevron Embossalicious embossing folder.
With the tyre tracks running over and squashing the poor hedgehog I just had to follow through with the wheelie theme <g>.  Although my grandson has not been to visit us in Saudi for a wee while now I still have his toy box so I decided to raid it and see if I could pinch a couple of his toy cars.  I fancied trying to use the wheels to created some design paper lol.  First I tried using white paper and a clear embossing stamp pad then rubbing black chalk on top.
 It looked fine until I put it over the printed type paper and then I found the colours were all wrong.
 So I tried again, this time using black card and a white stamp pad - much better.  I used embossing powder to give a plastic finish.
Onto colouring the digi.  As this is a monochromatic card I just used a black Promarker and a black Faber Castell Polychromos crayon.  The edges were also scribbled over with the crayon and then I heavily distressed the edges.  This was then mounted on black card and again I distressed the edges.  Rather pleased with the way this turned out as it really feels as if it has all been pulled through the hedges, so scruffy lol.
For the inside of the card I again printed some of the tyre paper and added a small uncoloured version of the digi in one corner.  Heck, when you are having a bad day you really do love to be reminded of it hahahahahaha
 For the assemble of the front in line with the sketch, I used the tyre track paper I made to make the two horizontal bands.  For the circles in the top left corner I pinched the wheels off a couple of Jays cars <g>.  In keeping with all the distressing I did on the image and mount I carried that through with more distressing on the type paper mount.  And there we have it :) hope you like :)


Ingredients:-
  • Image - Had a Bad Day by IKEsART
  • Colouring medium - Promarkes and Faber Castell Polychromos
  • White stamp pad
  • Embossalicious embossing folder
  • Clear embossing powder
  • DP, wheels etc from my stash
I am entering this project into the following challenges:-

Chocolate Calandar

I have been asked once again to contribute to the Barnemix site, a Norwegian crafting blog run by Anne-Lise, thank you Anne-Lise for the privilege :) :) :).  My last effort was a book box and this time I have been challenged to make a calendar from predesigned chocolate sentiments calendar sheets by  RetroSassDesigns. Here is what I came up with this time :) :)

First I made the box with a back and the drawer.  Both sections were covered with pink paper and edged with black and pink lace.
 Next I attached a peace button onto the drawer.  Not sure of the best way to do this but thinking about it, a toothpick seemed to be the answer. It fitted through the loop at the back of the button perfectly and should be strong for the pull when the drawer is opened  as the pressure is more widely distributed.  This button is a bit tongue in cheek as the person I am giving to is a work colleague who knows I hate pink (she is not fond of it either) and always threatened to have our office painted pink, my computer decorated with pink etc.  I plan to put this on her desk hahahahaha and the peace button is so I hope she will forgive me :)
 Next I printed the 12 calendar sections and mounted each on pink card.
 To hold the monthly calendar sections I made a matching box and this was attached to the back of my desk-top calendar.
 To hold the current month calendar on the box I made a wee box and placed pearls on the front edge.  This will stop the calendar card from slipping off.
 A bit more quirkiness lol.  The job we were doing (I have just left work) was pretty stressful and the only way to hold it all together at times was to be a bit off the wall.  I decided it would be fun to include some fun elements amongst the flowers to make her smile and in the end opted for a wee saying I found usually attached to a gift bag with the mentioned contents included.  I have used a Saudi coin (saying that is where we are) so she will never be broke, a marble in case she looses her marbles, a rubber band to stretch her imagination, a piece of string to tie things together when they fall apart and a heart so she knows she is loved.

 Here is a close up of the final embellishment.
 This is what the back of the box looks like with the remaining calendar cards in place.
 Front view
 Side view
 And here we have the drawer open.  When I give this to her I will be filling the drawer with chocolates :) :)


Ingredients
  • Predesigned chocolate sentiments calendar sheets by  RetroSassDesigns
  • All other items from my stash
Challenges entered:-

Monday, January 19, 2015

Uniqueness - part 2

This is my second post as GD for this months challenge over a Path of Positivity - Challenge #22 - UNIQUENESS

I am leaving my thought from my fist post about Uniqueness on this post, this might be the first time you have visited here and it saves me writing it all again - after all personal views don't change that fast hahahaha.

'Do you ever get the feeling that being UNIQUE is getting harder and harder as so many folks follow trends, live their lives through others, are moulded by school, government, church, fashion, media etc. to 'conform', to be one of the 'group'.  The surface of us to me is really far from unique but underneath, when we look at our inner thoughts and for those who dare speak out, dress differently etc. yep each and every one of us is Unique - it just needs to be looked for, bit like not judging a book by it's cover lol.

Right, I have said my bit, I could go on forever about finding uniqueness in life, in people, in everything around us but I won't hahahaha.  

For my second creation I am using the image 'Vaguely Goth' by IKEsART, I just love this image, last time I coloured it I did so based on the film 'Avatar' for a Movie Night theme so this is fun to colour her again with a different theme.  I have decided to make a box to hold Post-Its, a pad of paper and a pencil, something handy for a change instead of a card.


So onto this months sponsors for this challenge and the prizes for entering this challenge before I go any further with my creation:)
  • A prize package worth $10 of digi images (digital papers not applicable) from Scribbles Designs, one of our guest sponsors this month, for the post or project that the DT deems most inspiring of the bunch.

  •  A $10 gift certificate from Ike's Art, one of our guest sponsors this month, for a person chosen in a random draw based on all entrants.


There will also be:
  • One digital designer paper (made to order in a couple different ways) from Décosse's Dynamite Doodles for one lucky voter who leaves a comment.
  • One digital sentiment for every single person who enters the challenge.
WOW - that is a lot of prizes <g>
I think that is the important bits all mentioned so now I will tell you a little about my note pad box and what I did.

To begin with I folded and cut the box and cover for the holder.
Next I rummaged through my scraps of paper and found some awesome cut offs I have had for ages of crocodile skin and better still I had it in three colours - perfect.  As a contrast I used some zebra wrapping paper,  I tore each of the papers into small bits ready to decoupage my box segments.
Here is the outside completed.  I have used some crackle paint base over the top and later will put the top coat on - fingers crossed this stuff will work, I found it in a wee craft shop in Kenya and have no idea how long it has been sitting on the shelf <g>  The box for holding the note pad etc. was done in the same way.
Next I printed some synonyms of the word 'uniqueness' and airbrushed with orange Promarker.
Time to colour the digi, Promarkers were used for this plus a gold and a silver pen.
The image was placed on the top of the box cover and more of the crackle paint applied. This was put to one side to dry and I got on with making my pencil to go in the box.  I do love my wee IKEA pencils, mainly because they are free and so perfect for this sort of project.  I drilled a hole through the top of the pencil and then covered it in copper paint.  To make the bead chain I used light weight blue wire and threaded a fabulous and very special bead followed by small beads in copper and blue colours.  The special bead is from a Kenya and is a hand made clay bead from Kazuri Beads.  It is a wonderful story of how this bead factory first started up - in a nutshell, originally two Kenyan ladies were employed to make the beads as a way of giving them employment in 1975.  These ladies desperately needed to work in order to look after their families (often unmarried mothers).  Now many women are employed here and each of them along with their family members receives on top of their salery full medical care for themselves and their families, a huge benefit as medical in Kenya is not free and often beyond the financial ability of many locals.  I must have spent a good two hours in the back of the workplace with jars and jars and even more jars hunting for just the right beads for my crafting to bring back to Saudi with me.  Each bead is totally hand made from start to finish and so is 'unique', a one of a kind and just so perfect for this challenge :)
Time to try the top crackle coat.  Now I can add it was not brilliant, a very faint cracked effect but not strong enough to be be picked up by the camera :(
So here we have the finished box.  I added a line of Liquid Pearls to the bottom edge of the image just to finish it off.
On the inside of the box I added a quote by Mandy Hale which I thought was brilliant.

 Finally a full front view, after all the digi is the main part of this creation.

Thank you for stopping by and wishing you a happy crafting day :)

Ingredients:-
  • 'Vaguely Goth' by IKEsART
  • Die - Sizzix 657938
  • Colouring Medium - Promarkers
  • Papers from my scraps
  • Hobbycraft Creations base coat and Antique Crackle top coat
  • Liquid Pearls
  • Pencil, beads, paper pad, Post Its from my stash
I am entering this creation in the following challenges:-
  • Opus Gluei - JFF, 2W - #200 Anything But a Card
  • Scribble and Scrap - 2W, SIO, E3, C15, F -  #36 Always:  Anything Goes and CANDY
  • Alphabet Challenge - 2W, 1E, JFF - (W2 of 2) - X for X-periment (use a new technique) (TORN PAPER BACKGROND COLLAGE)
  • Wags 'n Whiskers - 2W, 2E, SIO - No. 145 - (W2 of 2) -  Anything Goes